With every update which google is releasing, Android is becoming more secure where google indirectly challenging developers to gain root access on Android devices.
While Chainfire’s systemless rooting with SuperSU is one of the best and easiest ways to root an Android device. It allows users to root their Android devices without modifying system partition, allowing users to install OTA updates even after the device is rooted.
You can alter your OnePlus 3T systemless-ly with Magisk Module. Where you can install different types of modules along with OxygenOS and uninstall it whenever you don’t need them. Thanks to developer topjohnwu who developed Magisk systemless interface for Android Devices, where users can install custom MODs without modifying system files.
Features
- 100% fully open source and easy to build!
- Magic Mount:
Allow you to do any system (vendor) modification without actually tampering the partitions. - MagiskSU: Open Source Root Solution
Root your device with MagiskSU, based on phh’s Superuser, which is based on CM Superuser. - Magisk Manager:
MagiskSU Root Management, Install / Upgrade Magisk in-app,
Manage, Upgrade, Download, Install Magisk Modules within a few taps. - Magisk Hide:
Hide Magisk from detection, including SafetyNet, which is used in Android Pay, Pokemon GO etc. - Resetprop:
Allow you to do any modifications to system props (build.prop), including read-only props. - Multiple Entry Points:
Provide several entry points to developers, reliably pausing the boot process before everything is done.
Include post-fs (cache) mode, which happens even earlier than data is mounted (used to replace Boot Animation etc.) - Standard Stuff:
Remove dm-verity, forencrypt; includes a super complete busybox to guarantee consistent behavior, and can also be toggled to be used universally.
DISCLAIMER
RootMyGalaxy.net is not responsible for any damage happened to your device(s) while following this guide, Proceed at your own risk.
PRE-REQUISITES
- Unlocked Bootloader.
- You should have TWRP installed in your device.
- We recommend to take complete backup and proceed.
- Maintain 50-60% battery to prevent sudden shutdown between the process.
List of Magisk Module’s for OnePlus 3T
- Google Pixel Launcher v1 – Download
- Google Pixel Sound Set v1 – Download
- Google Dialer – Download
- Google Assistant –Download
- Google Daydream VR – Download
- Chrome Homepage – Download
- SELinux Display – Download
- EmojiOne Replacer – Download
- PhaseBeam Live Wallpaper – Download
- ViPER4Android FX 2.3.4.0 – Download
- APT-X HD Codec – Download
- Key layouts for Gaming Controllers – Download
- Snapdragon Camera –Download
- Stereo Speakers and Mic Gain – Download
Downloads
Magisk Manager – Play Store | Direct Link
Disclaimer: These Magisk modules only if you have installed the Magisk 10.2, along with Oxygen OS 4.0.2.
Steps to Install Magisk Module’s on OnePlus 3T

Rooted Device
- Download and Install Magisk Manager app from Play Store
- Download the magisk modules and save them in internal storage
- Install the Magisk Modules step by step and shown in app.
- Reboot, and you’re done!!
Unrooted Devices
- Download the Magisk Module zip file from above and transfer the file to your device.
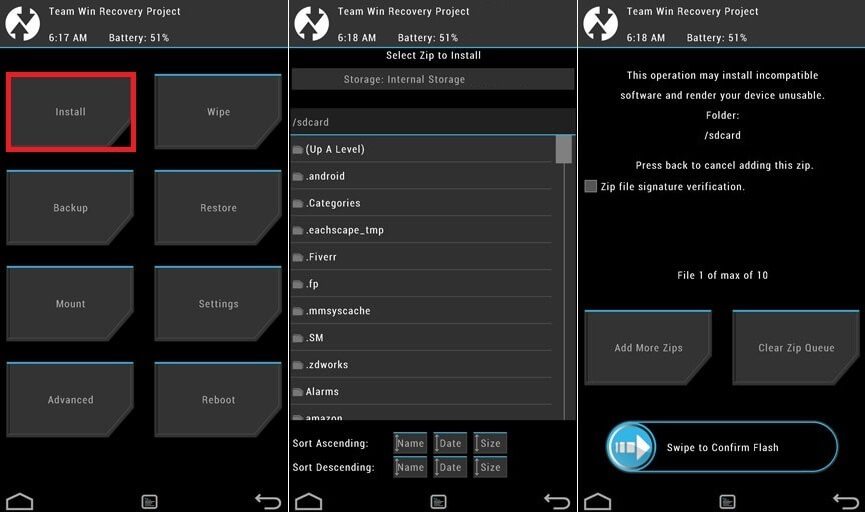
- Boot your device into TWRP recovery. Guide How To to Boot Into Recovery Mode On Android (Various Ways)
- Once done, go back to TWRP main menu, tap on “Install” and select Magisk Module (zip file) that you transferred to your device in Step 1.
- After selecting the .zip file, do “Swipe to Confirm Flash” on the bottom of the screen to begin the Magisk Module installation process.
(This may take some time as it is a fresh flashing process).

- Once your zip file is successfully installed, go to “Wipe cache/Dalvik” option, select it and then do “Swipe to wipe” on the bottom of the screen.
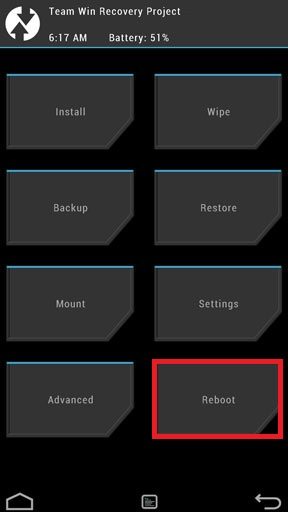
- Once done, reboot your device from the TWRP main menu

- Done!!!
Hope you fount this article helpful. If you have queries let us know in the comment section below.
Source: XDA
Liked this post? Let us know on X (formerly Twitter) - we love your feedback! You can also follow us on Google News, and Telegram for more updates.