The all-new Xiaomi Redmi Note 9 Pro has recently launched in March 2020 that has pretty good hardware specifications and this time Xiaomi has comes with a new rear camera module that looks cool enough. The handset runs on MIUI 11 over Android 10 out of the box. Now, as a Xiaomi device user or as an Android lover, if you want to unlock the device bootloader and install root access on your Redmi Note 9 Pro using Magisk then this guide is for you. Here you can check out the steps on How To Unlock Bootloader and Root Redmi Note 9 Pro (No Twrp).
The Redmi Note 9 Pro comes with a 6.67″ IPS LCD display (1080×2400 pixels), Snapdragon 720G (8nm) processor, Adreno 618 graphics, 4/6GB of RAM, 64/128GB of onboard storage, 48-megapixels quad rear camera with 8+5+2-megapixels & plenty of other features. It also features a 16-megapixels selfie shooter, Wi-Fi, Bluetooth 5, GPS, A-GPS, GLONASS, Type-C port, a 5020mAh battery, 18W fast charging, a side-mounted fingerprint sensor, an accelerometer, gyroscope, proximity, compass sensor.
Rooting your Xiaomi Redmi Note 9 Pro gives you additional benefits like you can install special apps, flash custom ROMs, you can streamline your phone performance and many extra features. The real performance of an Android smartphone can only be unlocked once it is rooted. Rooting your Xiaomi Redmi Note 9 Pro, lets the user flash different Custom MODs, ROMs, and such stuff onto the device.
For more information about Android rooting, check out our detailed post here > What Is Rooting Android Phone? Advantages And Disadvantages

Important Note: Without TWRP, you can’t flash the root files like Magisk. Now we have to manually modify the stock boot image by patch to get root access on the device
How To Root Xiaomi Redmi Note 9 Pro With Magisk Manager
#1 Unlock the bootloader on Xiaomi Redmi Note 9 Pro
- Enable the Developer Option, USB Debugging and OEM Unlock (Go to Settings > About phone > MIUI Version. Click 7 times on the MIUI Version to enable the Developer Option. Now Go back to Settings > Developer Option and Enable OEM Unlock.)
- Now again go to Settings > Mi account > MI Cloud > Enable Syn and Find Device
- Now login to Mi Cloud Server to check whether your device is syn or not. If there are other devices synced with your mi cloud, remove them.
- Download the Mi Unlock tool – CLICK HERE. Once you download the file, Extract the MiFlashTool Zip file
- Now Go to the extracted files and open MiFlashUnlock

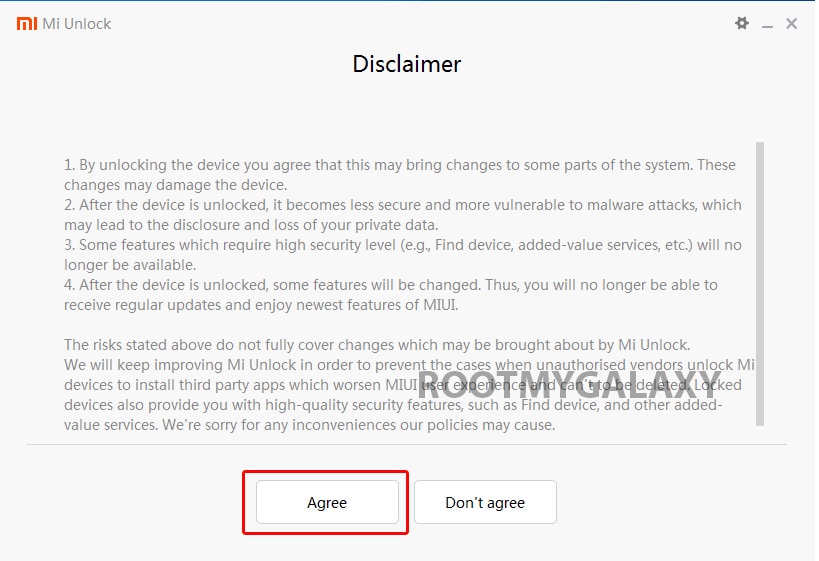
- A new disclaimer page will appear, read it and click Agree
- Now you will be asked to Log in. Log in with your Mi Account, If you don’t have one then Sign UP – CLICK HERE to Sign Up
- Now boot your Xiaomi Redmi Note 9 Pro to Fastboot/Bootloader mode by Press and hold the power button – tap the Power Off – once turned off, Power button and the Volume Down button at the same time.
- Now, connect it to your PC via the compatible USB Data cable
- Your device will be shown as connected.
- Note: If a message shown on the screen that your device is not supported by Mi Unlock. Don’t worry. Just click on the Go button to continue
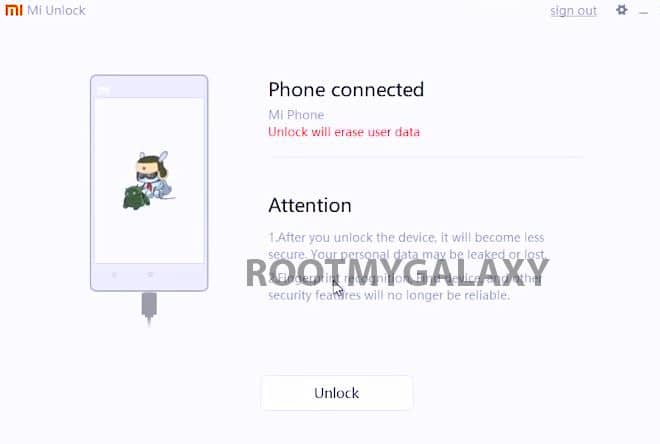
- Now Click On Unlock. It will show some warning, escape that. It will start the unlocking process automatically.

- Once the process is completed, reboot your device. Your device’s bootloader should be unlocked. You can check the bootloader lock status from the settings.
#2 Get the stock boot image (Firmware)
- Download Stock boot image (Stock ROM which comes with the device)
#3 Patch boot image
- Move the boot.img to your device’s internal storage.
- Download & install the latest Magisk Manager on your device
- Open magisk manager, On the main screen, select Install > Install > Patch Boot Image File
- Now select the boot image (boot.img). Magisk will start to patch the boot image.
- After completion, the file will be saved as “magisk_patched.img” in your Downloads folder
#4 Steps to Root Xiaomi Redmi Note 9 Pro
- Connect your device to PC and transfer the “magisk_patched.img” file from your phone’s download section to the platform-tools folder on your PC
Download and Install Latest ADB and Fastboot SDK Platform-Tools (2019)
- Now issue the following command to boot your device to bootloader mode (Make sure your device is connected to the PC)
adb reboot bootoader
- Now issue the command given below to Flash the patched boot image
fastboot flash boot magisk_patched.img
- For devices with A/B partition system, use the below commands:
fastboot flash boot_a patched_boot.img

fastboot flash boot_b patched_boot.img
Done !!! Just reboot your device. Your device should be rooted now. Keep visiting the blog for more guides and info.
