The Android 13 firmware has been the talk of the tech world for some time and Samsung is among the earliest adopters of the new OS build. The fifth variant of the One UI comes with a wide variety of exciting features in addition to many under-the-hood tweaks too. If that wasn’t enough, the users can also root their devices and open a pathway to countless tweaks and modifications. In this guide, you’ll get to know how to root Android 13-based Samsung One UI 5.0 using the Magisk Patched ap.
You can try out a wide variety of modifications to your device once you have rooted it by flashing the Magisk-patched boot.img using Fastboot Commands. Custom ROM flashing, custom recovery installations (like TWRP), and custom kernel flashing are all examples. Additionally, you can flash Magisk Modules, Xposed Framework, Substratum Themes, Viper4Android, and similar apps. But this is only one side of the argument. There are drawbacks to this approach.
An unlocked bootloader is the first step in the rooting process. If you do this, your device’s warranty will be voided and you’ll lose access to any data stored on it. As such, rooting will trigger the Knox, which could prevent apps that rely on it from working. If these shortcomings don’t bother you, the tutorial to root One UI 5.0 can be found beneath.
Steps to root Android 13-based Samsung One UI 5.0 using the Magisk Patched ap

Step 1: Unlock the bootloader
- To start off, enable Developer Options followed by OEM unlocking on your Samsung phone
- After that, boot it to the Download Moe
- Press and hold the Volume Up key for a couple of seconds until you’re taken to the Device Unlock Mode
- Lastly, hit the Volume Up button for confirming the unlocking of the bootloader
- Once your device boots up, you should connect it to the Internet and then verify that the OEM unlocking is enabled
Step 2: Download the One UI 5.0 stock firmware
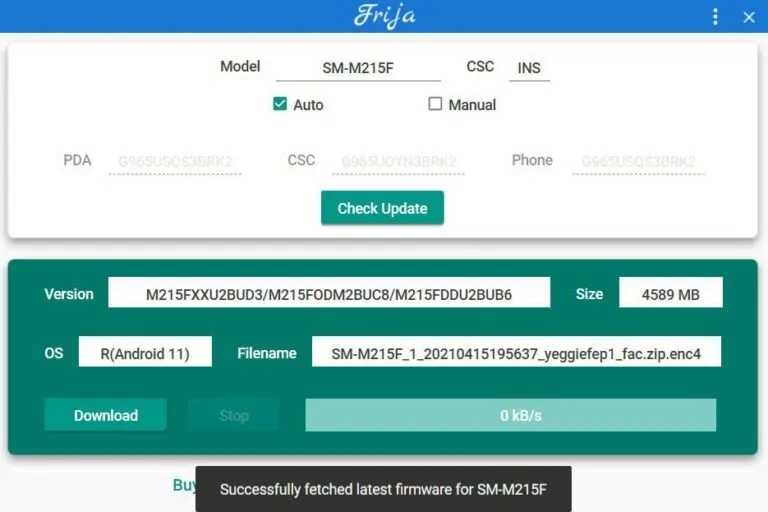
- Start by downloading the Frija Tool and then extract it to your PC
- Relaunch the tool before typing your device’s Model Number and CSC Code
- After that, click on the Check Update button and it’ll bring up the latest Android 13 firmware
- Click on the Download button and choose the directory where you want to download the firmware and then hit Save
- The downloading process will start
- Once it is done, the tool will decrypt the firmware
- Once the decryption is complete, it’ll spell out the Download Complete message
- Head over to the folder where you’ve downloaded the firmware and then extract it
- After extraction, you’ll get the AP, CP, BL, CSC, and Home CSC files
Step 3: Install Magisk and then check Ramdisk

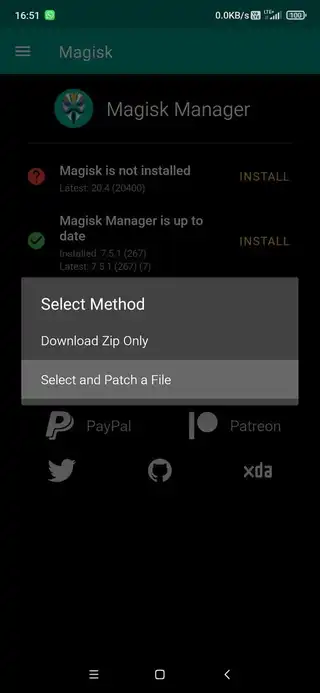
- To start, download and install the Magisk app on your smartphone (it is recommended that you should try the Canary build)
- Once installed, you should launch the app and then note down the value next to Ramdisk
- Note down the YES/NO value as it’ll come in handy later
Step 4: Patch the Samsung AP File
- Go to the folder where you had extracted the firmware files
- Transfer the AP TAR files over to your device
- Then, launch the Magisk App and then tap on the Install button next to Magisk
- In case your device doesn’t have Ramdisk, ensure that the Recovery Mode option is enabled
- Now, choose Select and Patch a File before navigating to the AP TAR file and then select it
- Tap on the “Let’s Go” button located at the top-right corner and then wait for the patching to complete
- Once it is done, you’ll get the patched AP file named “magisk_patched_[random_number].tar” under the Downloads folder
Step 5: Send Patched AP TAR to PC using ADB pull
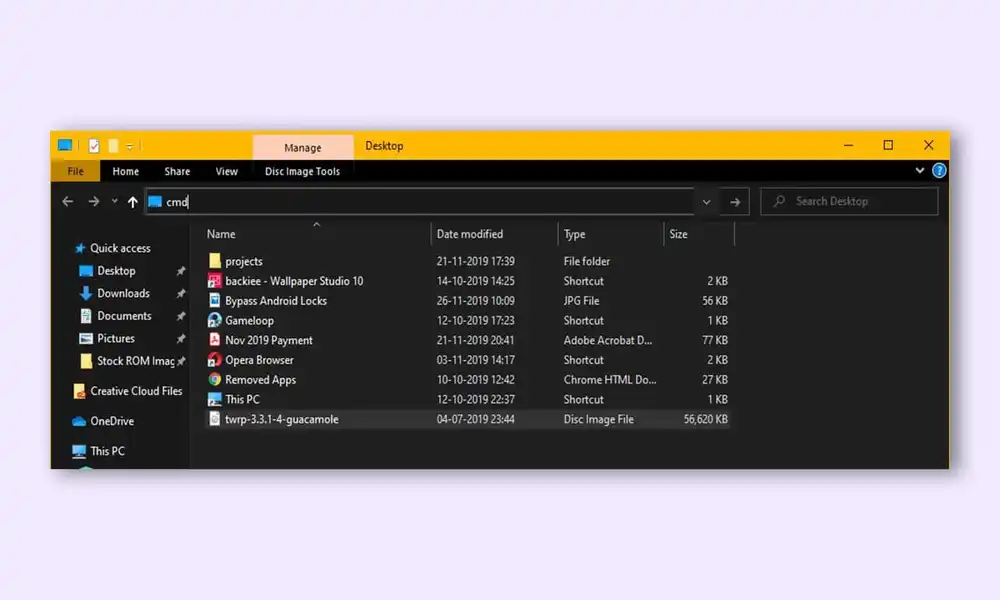
- To start off, download Android SDK Platform-tools and then extract them to any convenient location on the PC
- After that, go to the platform-tools folder and type in CMD in the address bar before hitting enter to launch the CMD window
- Connect your smartphone to the PC using a USB cable (ensure that you’ve enabled USB debugging from Developer Options)
- Use the following command for transferring the patched AP file to your PC –
adb pull/sdcard/Download/magisk_patched_[random_strings].tar
Step 6: Boot your device to Download mode
- Power off your smartphone
- Press and hold the Volume Up + Volume Down keys together
- while keeping both these keys pressed, connect your smartphone to the PC using a USB cable
- Lastly, leave the two buttons and hit the Volume Up key for booting to Download mode
Step 7: Install Odin

- To start off, download the Odin tool and extract it to a convenient location on your PC
- Then, go to the folder where you’ve extracted Odin
- Double-click on the Odin exe file for launching the tool
Step 8: Flash the patched AP and then root Samsung One UI 5.0
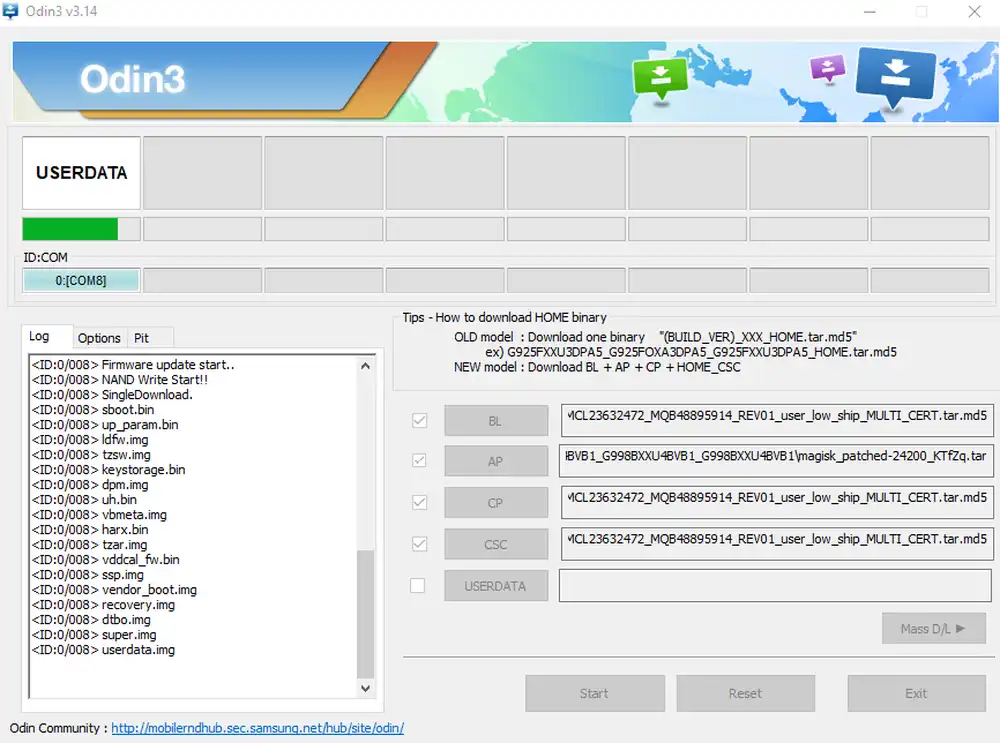
- Launch the Odin tool and click on the BL button
- Navigate to the extracted firmware folder before selecting the BL file
- Then, click on the AP button and navigate to the patched AP.tar file before selecting it
- Then, click on the CP button and navigate to the extracted firmware folder before selecting the CP file
- Then, click on the CSC button and navigate to the extracted firmware folder before selecting the CSC file
- It is advised that you should flash the normal CSC file instead of the Home_CSC file as there will be a requirement for a factory reset
- Once the files are loaded, click on the Start button and the flashing will begin
- Once it is done, you’ll get the “PASS!” message and your device will be automatically booted to the OS
Step 9: Boot to Stock Recovery for enabling Magisk
- Press the Recovery key combination buttons that you wish to use to boot your smartphone to recovery
- Once you see the splash screen, long-press the Volume up key and you’ll be booted to the Recovery mode
- Once it is done, Magisk will be enabled and you can reboot the OS
Step 10: Complete the Magisk setup
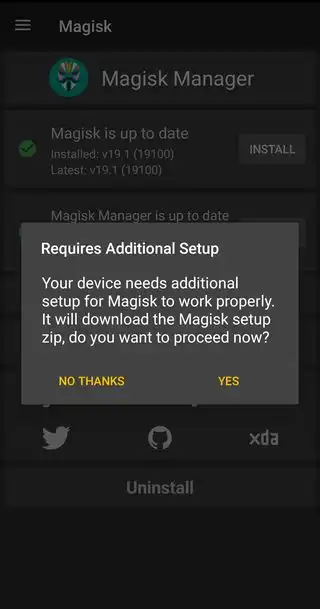
- Once your smartphone boots up, launch the Magisk app
- It’ll ask for additional setup and you’ll need to tap on “OK”
- Magisk will install the additional dependencies
- Once done, your device will be rooted automatically
This concludes our tutorial on using Magisk to gain root access on a Samsung device with the One UI 5.0 based on Android 13. Please let us know in the comments if you have any questions about the procedures outlined above.
