Unlock bootloader and Root Galaxy Z Fold 4: The Galaxy Z Fold 4 is the latest folding device from the South Korean smartphone giant and it has a lot of nifty features. The device is an active player when it comes to custom development, be it for flashing custom RPMs, welcoming a plethora of mods, gaining administrative access by rooting your device, and more.
If you want to get the most out of Android’s open-source environment, you need to unlock the bootloader. It will allow you to do things like flash a custom recovery like TWRP and install a custom ROM. In the same way, rooting your device with Magisk will grant you access to the system partition and superuser permissions.
These tweaks create unintended risks. First, it’ll erase all data and void the device’s warranty. Apps like Samsung Pay and Secure Folder may not work if the Knox counter is tripped. The SafetyNet will also be triggered, blocking banking apps.
Before you try to root or carry out any tweaks, you’ll need to know how to unlock bootloader on your Galaxy Z Fold 4. In this guide, you’ll get to know how to unlock bootloader and root Galaxy Z Fold 4.
How to unlock bootloader on your Galaxy Z Fold 4
Step 1: Enable the developer options on your Galaxy Z Fold 4
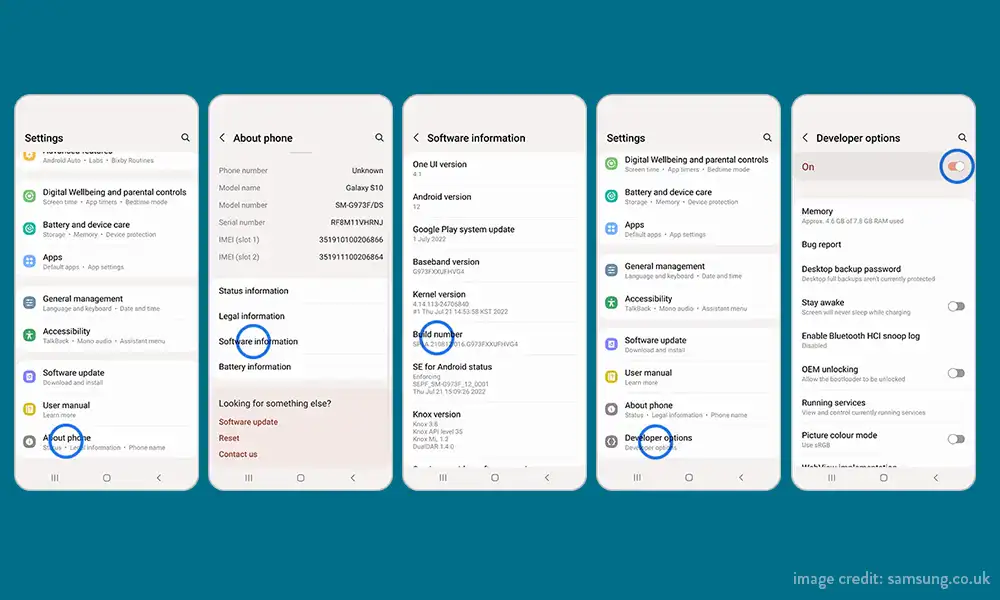
- Go to Settings -> About Phone
- Head over to Software Information
- Tap on Build Number 7 times and you’ll get a message stating “You’re now a developer”
- It signifies that the Developer Option has been enabled
Step 2: Enable OEM unlock on your device
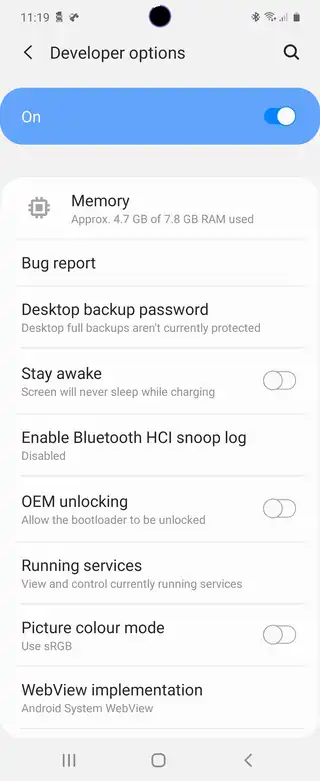
- Go to Settings -> Developer options
- Enable the toggle next to OEM unlocking
- Now, you should tap Yes/Turn On in the confirmation dialog box
Step 3: Boot your device to Download Mode
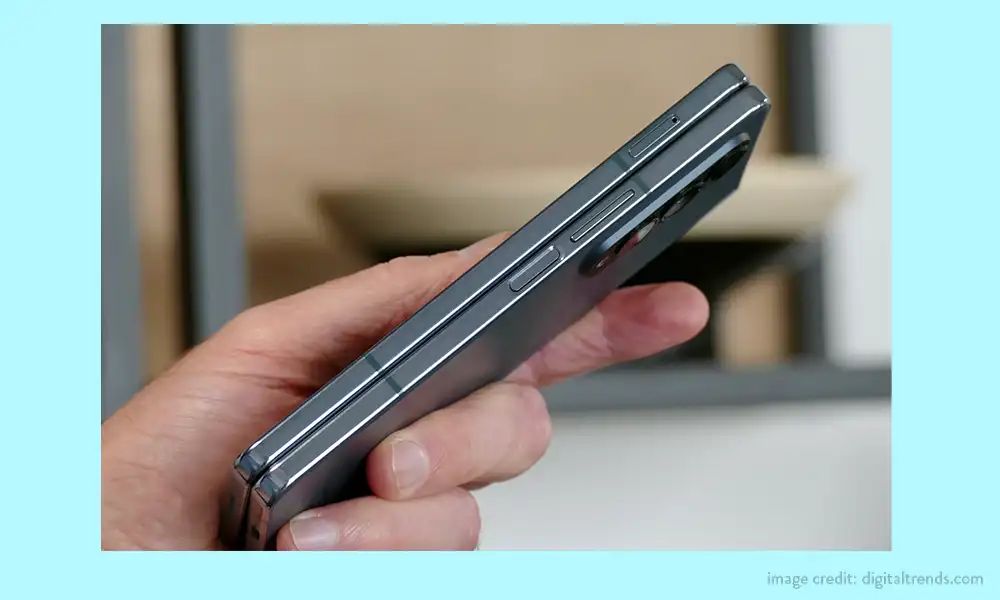
- Begin by powering off your device
- Press and hold the Volume Up + Volume Down buttons together and then connect your smartphone to the PC using a USB cable
- Once you see the Warning message on your smartphone, release the pressed keys
- Finally, you’ll have to press the Volume Up key and your smartphone will be booted to Download Mode
Step 4: Unlock bootloder on your Galaxy Z Fold 4
- Now, your smartphone will get booted to Download Mode
- Press and hold the Volume Up key for a couple of seconds
- It will take your device to the Device Unlock Mode
- You’ll get a confirmation message whether you want to proceed ahead or not
- Use the Volume Up button for replying to the affirmation
- It’ll wipe all the data on your smartphone and subsequently unlock the bootloader
- Once it is done, your smartphone will automatically boot up to the OS
Step 5: Bypass VaultKeeper on your device
- You’ll need to notify the VaultKeeper that you have unlocked the device’s bootloader
- To do that, connect your smartphone to the internet
- Head over to Settings and enable Developer Options
- Ensure that your OEM unlocking toggle is turned on
How to root your Galaxy Z Fold 4

Step 1: Unlock the bootloader
First, you’ll have to unlock the bootloader on your Galaxy Z Fold 4. Remember that doing so can trip Knox and reset your smartphone.
Step 2: Download the stock firmware for your Galaxy Z Fold 4
- To start off, download the Frija Tool and then extract it to a convenient location on your PC
- After that, launch the tool and then type your device’s Model Number and CSC Code
- Click on the Check Update option and it’ll bring up the latest available firmware
- Now, click on the Download button and then select the directory where you want to download the firmware
- Hit save to save the file
- The download process will start
- Once it is done, the tool will decrypt the firmware
- Once the decryption is complete, it’ll spell out the Download Complete message
- Head over to the folder where you’ve downloaded the firmware before extracting it
- After extraction, you’ll get the AP, CP, BL, CSC, and HOME_CSC
- You’ll be using these files to root your device via Magisk
Step 3: Patch your Samsung Galaxy Fold 4 AP via Magisk
- To start off, download the AP file from the extracted firmware folder to your device
- Download and install the newest version of the Magisk app
- Launch the app before tapping on the Install button next to Magisk
- Choose Select and Patch a File before navigating to the AP TAR file and then select it
- Tap on the Let’s Go button located at the top right and wait for the patching to complete
- Once it is done, you’ll get the patched AP file named magisk_patched_[random_number].tar in the Downloads folder
Step 4: Send the Patched AP file to your PC
- To start off, download Android SDK Platform Tools before extracting them to any convenient location on your PC
- Go to the platform-tools folder, type in CMD in the address bar, and hit enter to launch the CMD window
- Connect your smartphone to the PC using a USB cable
- Remember to enable USB debugging from Developer Options
- Next, use the below command for transferring the patched AP file to your PC
adb pull/sdcard/Download/magisk_patched_[random_strings]
Step 5: Boot your device to Download Mode
- Begin by powering off your smartphone
- Press and hold the Volume Up + Volume Down buttons together and connect your smartphone to the PC using a USB cable
- Once you see the warning on your smartphone, release the pressed keys
- Press the Volume Up key once and your smartphone will be booted to Download Mode
Step 6: Install Odin
- Download the Odin tool from here
- After that, extract it to a convenient location on your computer
- Then, go to the folder where you’ve extracted the tool
- Lastly, double-click on the Odin3_v3.14.4 EXE File for launching the tool
Step 7: Flash the Patched AP file using Odin and root your Galaxy Z Fold 4
- To start off, launch the Odin tool
- Click on the BL button, navigate to the extracted firmware folder before selecting the BL file
- Then, click on the AP button before navigating to the patched AP.tar file and select it
- Now, click on the CP button, go to the extracted firmware folder, and then select the CP file
- Click on the CSC button, go to the extracted firmware folder, and then select the CSC file
- Once the files have been loaded, click on the Start button
- The flashing will start and can take a few minutes
- Once it is done, you will get the Pass! message and your smartphone will boot to the OS automatically
That’s all there is to it. The Galaxy Z Fold 4 can be rooted and its bootloader unlocked as described above. Leave a comment below if you have any questions about the procedures we just discussed.
Liked this post? Let us know on X (formerly Twitter) - we love your feedback! You can also follow us on Google News, and Telegram for more updates.
