If you like trying new features in beta software, you might also want a more stable version later. This guide shows you how to go from Android beta updates to the stable public version. This change makes sure you can move your data easily and use more reliable software.
Table of Contents
Things to Know Before You Quit the Beta Program
Before you quit the Android Beta Program, you should know what it means – When you quit, your device will get an update that puts the latest stable Android version on it and deletes all your data. If you say no to this update, you’ll have to wait 3-4 months to get the next stable version by itself. If you have the last public beta version, your data will stay.
Why You Might Want to Quit the Beta Program
You might want to quit the Android Beta Program for different reasons. Maybe you don’t like the new features or the bugs in the beta software. Maybe you want to use the stable version that most people have. Maybe you need to sell or give away your device and you want to erase your data. Whatever your reason, quitting the beta program is easy and you can always join again later.
Also Read: December 2023 Pixel Feature Drop: Video Boost and More
How to Quit Android Beta Updates
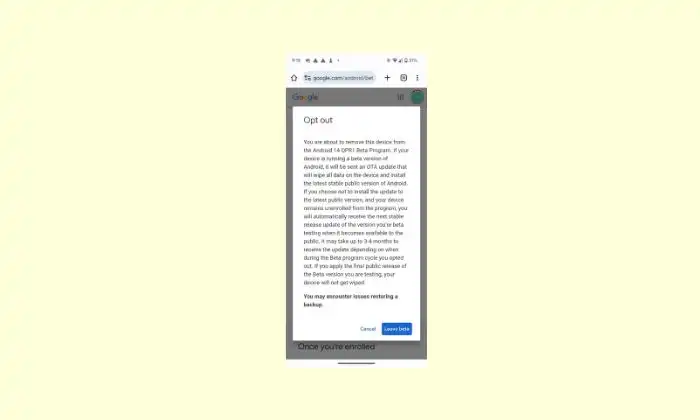
To quit the beta program:
- Go to the Android Beta page.
- Find and pick your Android device that is in the program.
- Click “Opt out.”
- Say yes by picking “Leave beta.” These steps get you out of beta testing and back to stable versions. This way works for all Android versions.
How to Install Stable Android Easily
After you quit, you might want to install the latest stable version. Here’s how to do it step by step:
- Get the Right Drivers Download the phone drivers you need from Google. The right drivers help the installation go smoothly.
- Connect Your Phone to Your Computer Use a USB cable to plug your phone into your computer. This link is important for the next steps.
- Turn On Developer Settings Turn on “OEM unlocking” and “USB debugging” in the Developer options. If you don’t see these options, go to Settings > About phone > Build number (tap it 7 times).
- Go to the Android Flash Tool Page Use this tool in your browser to install the Android version you want.
- Pick Your Version Pick the 64-bit or 32-bit version that matches your phone. If your phone can use both, pick the versions that say “(signed)” for the best fit.
After finishing this process, you will have Android 14 successfully installed on your Pixel smartphone. Remember, these steps are applicable for any Android version.
Image Credit: reddit
