The new iOS 17 beta developer has already been made available for people subscribed to the Apple Developer Program. Once you’ve upgraded your eligible iPhone model to the latest iOS version, you will be able to set it up.
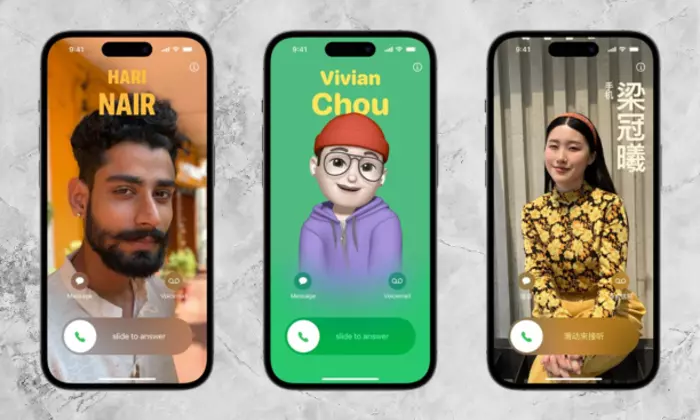
It comes with a variety of new features, including Contact Photos and Posters. In this feature, you’ll be able to set a photo or memoji that gets displayed on the fullscreen for a person you’re calling.
If you’re looking to use the Contact Photos and Posters feature, then this guide will be helpful. In this guide, you will get to know how to enable Contact Photos and Posters on your iPhone.
Table Of Contents
show
Steps to enable Contact Photos and Posters on iPhone
- Open the Phone app and then choose the “Contacts” tab. At the top, you’ll get the “My Card” option, you need to tap it to open it.
- Now, you should tap “Contact Photos and Posters” and enable the “Name and Photo Sharing” option.
- Enter the first and last name that you want to appear on your screen for the person you’re calling. You’ll be able to choose if the contact photo and poster are visible to Contacts Only or if iOS will “Always Ask” before sharing it. Now, you should tap on “Edit” to begin.
How to setup photos as contact
- Like the lock screen, you’ll be able to create multiple contact posters and change them as and when you want. Three contact posters will be created by default but you can create more by tapping on the “+” icon. Then, tap on the “Customize” option to begin.
- After tapping on Customize, you will get two options – Contact Photo and Poster. You need to select the “Contact Photo” option. Next, you can either use your camera for clicking a selfie or choose one of the existing “Photos” from Gallery app, create and use the Memoji, and finally use a Monogram. For instance, say that you’re choosing a photo from Gallery.
- You can crop the photo as you want and once you’re done, simply tap on “Choose” for finalizing it. Then, you’ll be able to select one of the filters and when happy, you should tap on “Done” for saving changes.
- You’ll be asked to confirm if you’re wish to “Use This Photo Everywhere” or you want to make more changes. You can choose the “Not Now” option.
How to setup posters as contact
- Repeat Steps 1 and 2 but instead of a photo, you should select “Poster” in Step 2. You will get 4 options. Memoji would be a neat choice as it’ll allow you to have fun.
- Now, tap on the color picker in the lower left corner for choosing a background color for the poster. You will be able to select a background color, move the slider for changing shade, or pick your own color.
- Return to the previous screen and tap on the memoji icon for picking either an existing memoji or tap on the “+” icon for creating your own.
- When you’re selecting a memoji, you’ll get to choose one of the different variations of the chosen memoji on the next screen. Pick the option that you think best represents you or is cool enough. Then, you should tap on “Next”.
- Lastly, you will be able to preview the poster. This is how you’ll appear on the receiver’s screen. Tap on “Continue” and then press “Done”.
