Realme GT Neo 2 is a device that managed to grab the attention of everyone when it was first announced. It is fair to say that the device has definitely lived up to the hype. Aside from having most of the features that the audience looks for, there are many custom options for tech enthusiasts too. There is no better way of confirming this than by the fact that there are already many Android 13-based custom ROMs that you can download and install. In this guide, you will get to know all about how to download and install Android 13 Custom ROMs on Realme GT Neo 2.
Table of Contents
How to download and install Android 13 custom ROMs on Realme GT Neo 2
Step 1: Download the files needed for installing the custom ROM
First, you should grab hold of the Android 13 custom ROM file for your Realme GT Neo 2. Once downloaded, you should rename the ROM file to “rom.zip” and recovery to “recovery.img” so that you can maintain uniformity in the commands while it’ll also become easier to type in the CMD window. Likewise, make sure that you transfer the files to the platform-tools folder on your PC.
Custom ROM files
Project Elixir – ROM | Recovery
Additional files
Step 2: Install Android SDK
To start off, install the Android SDK Platform Tools on your PC or computer. It’s the official ADB and Fastboot binary provided by Google. You should download it and extract it to a convenient location on your PC. Doing this will give you the necessary platform-tools folder.
Step 3: Enable USB Debugging and OEM Unlocking
Then, you will need to enable USB Debugging and OEM Unlocking on your smartphone. The former makes your smartphone recognizable by the PC in ADB mode. Meanwhile, it’ll allow you to easily boot your smartphone to Fastboot Mode.
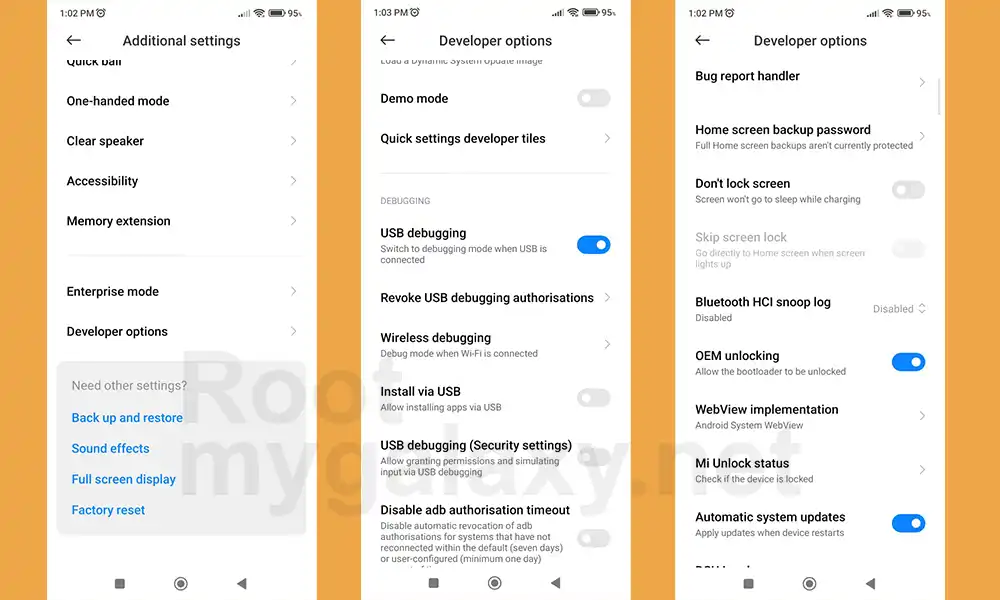
OEM Unlocking will be needed to carry out the bootloader unlocking process. You’ll need to go to Settings -> About Phone -> Tap on Build number 7 times -> Return to Settings -> System -> Developer Options -> Enable USB Debugging and OEM Unlocking.
Step 4: Unlock Bootloader on your Realme GT Neo 2
You’ll also need to unlock the bootloader on your Realme GT Neo 2 if you’re looking to install a custom ROM. Remember that doing this will wipe off the data and might even make your device’s warranty null and void.
Step 5: Boot your device to Fastboot mode
- Connect your smartphone to the PC using a USB cable
- Go to the platform-tools folder and type in CMD in the address bar before hitting enter to launch the Command Prompt
- Enter the following command in the CMD window for booting your device to the Fastboot Mode –
adb reboot bootloader
- Now, type the following command to verify the Fastboot Connection –
fastboot devices
- If you’re getting the Device ID followed by the Fastboot keyword, then your connection stands successful
Step 6: Install the Android 13 Custom ROM on your Realme GT Neo 2

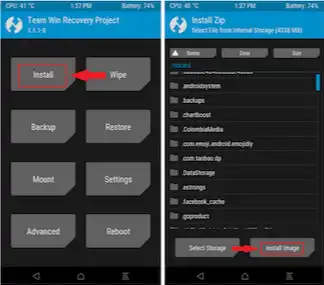
- Type the following command to flash the TWRP Recovery file (by downloading the selected link from the Downloads section above)
fastboot flash recovery recovery.img
- Now, use the below command for booting your device to TWRP Recovery
fastboot reboot recovery
- Once you’ve done that, go to Wipe -> Format Data -> type “Yes” before hitting Enter
- Now, go to Wipe -> Advanced Wipe -> check Cache, Dalvik, and Data
- Once you’ve done that, you need to go to Install, select the ROM.zip, and then perform a right swipe to flash it
- Lastly, you should head over to Reboot and select System
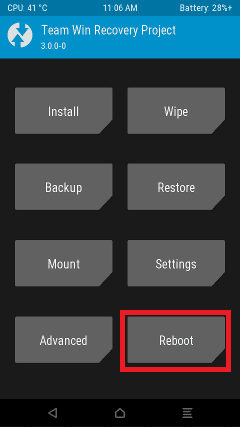
- Your Realme GT Neo 2 will now be booted to the newly installed OS
Completing the installation of an Android 13 custom ROM on your Realme GT Neo 2 is as simple as following the steps outlined here. If you have any issues or need further guidance, feel free to leave a comment in the comment section down below and we’ll be happy to provide assistance.
