The Stock ROM / Firmware Of Nokia X6 / Nokia 6.1 Plus is now made available for download. Don’t be confused, the Nokia X6 and Nokia 6.1 Plus are the same device. Nokia X6 (China) was launched as Nokia 6.1 Plus in the global market. Follow the guide given below to safely Install Nokia X6 / Nokia 6.1 Plus Stock Firmware and return back to Stock ROM.
Table of Contents
About Nokia X6 / Nokia 6.1 Plus
The Nokia 6.1 Plus is also known as Nokia X6 in China was released in August 2018. The device comes equipped with a 5.80-inch touchscreen display (1080 x 2280). The Nokia X6 is powered by a Qualcomm’s Snapdragon 636 SoC coupled with an Adreno 509 GPU which is paired with 4 GB (32/64GB storage variant), 6GB of RAM (64GB storage variant).
The storage can be expanded up to 256GB via a microSD card. The Nokia 6.1 Plus sports Dual camera (16MP + 5MP) on the rear and a 16-megapixel front camera. The Nokia 6.1 Plus 2018 runs Android 8.1 Oreo straight out of the box and houses a 3060mAh non-removable battery
About ROMs In Android Ecosystem
Android is an open source platform so it allows users to replace the stock ROM or re-installed the operating system with any compatible third-party ROMs. In computer language, the ROM stands for READ ONLY MEMORY that means you can not edit or delete the ROM. However, when it comes to Android there is a different meaning for the ROM. In Android, it means firmware of the device. Installing ROM on the Android device is as same as installing an operating system on a computer device.
In the Android Ecosystem, there are two types of ROMs or Firmware exists. One is Stock Firmware which is provided by the manufacturer and comes pre-installed with the device and the second one is Custom ROM which is developed by third-party developers or team. Most of the cases, Stock Firmware is more stable compared to the Custom ROMs whereas Custom ROMs provides more features and updates compared to the Stock ROM

Disclaimer:
RootMyGalaxy.net is not responsible for any damage happened to your device(s) while following this guide so please proceed at your own risk. However, we would be happy to help about any problems within our reach
Pre-Requirements:
- Make sure the battery percentage is more than 60%
- Install the USB driver on your phone.
- Install ADB & Fastboot drivers on your computer. Guide Quickest Way To Install Android ADB and Fastboot (with drivers) on Windows or How to Install ADB and Fastboot on Mac or Linux
- Now Enable Developer option. Guide How to Enable Developer Options & USB Debugging on Android
- Create a nandroid backup on your device How To Create & Restore Nandroid Backup On Android Devices
Download:
- For Nokia X6 TA-1099 (China variant) – DRG-347C-0-00CN-B04 – Android 9.0 Pie
- Nokia 6.1 Plus TA-1103 (Hongkong & Taiwan variant) – 00WW_3_30B – Android 9.0Pie
Steps To Install Official Nokia X6 / Nokia 6.1 Plus Stock ROM/Firmware (Back to stock, Unbrick, Unroot and Fix Bootloop)

- First of all, make sure you have followed each and every step mentioned in the pre-requisites section
- After that, you have to download the files mentioned in the Downloads section and transfer them onto your phone
- Once you have done all the steps mentioned in the guide, your phone should be upgraded to Android Nougat
Note: Follow the linked post below, then scroll down to the bottom portion of the post. There you can find the installation part. All the steps will be the same for all Nokia phones.
How to Flash Stock Firmware On Nokia PhonesNote: As the device is powered by Spandgraon CPU you can use QFIL Tool to flash the firmware manually. Guide is given below
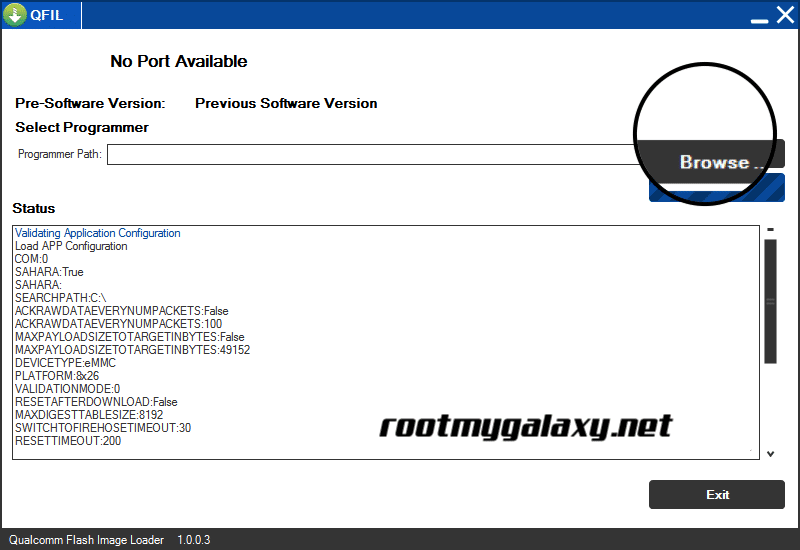
Using QFIL Tool
Step 1: Make sure that your PC has Qualcomm USB drivers installed on it. (If not download and install them, check pre-requirement section)
Step 2: Download the Qualcomm Flash Image Loader (QFIL) on your computer and Extract that using any unzipper app like WinRAR.
Step 3: Now go to the extracted folder and Open QFIL.exe.

Step 4: Once you enter the QFIL tool, you will see the basic user interface of the tool.

Step 5: Now, Switch Off your Smartphone or Tablet.

Step 6: After your Device is powered Off, Press and Hold Volume UP Key and Connect the Device to the Computer using USB Cable.

Step 7: Now, In QFIL, Click on Browse Button
Step 8: Now locate the Firmware File (.mbn).

Step 8: Once, you have added the firmware file, QFIL will automatically load the rest of the firmware data.
Step 9: Now, Click on the Download button to begin the Flashing Process.

Step 10: Like all other devices and tool, this flashing Process will take up to 10-15 minutes to complete. Once the Flashing process is completed your device will be reboot automatically.
You have successfully installed the stock firmware on your device. If you have any question related to this guide, feel free to leave that in the comment section down below.
