While there is no denying that the smartphones from Xiaomi offer the best value for money, some of them have too much bloatware while others fall short on the software side. Further, its in-house OS skin, MIUI, comes with a lot of preinstalled apps that only end up slowing down the device and giving a bloated user experience. If you’re having the same experience on your Xiaomi Mi 9, you’ll be glad to know there’s a way to be free from the shackles of the Xiaomi ecosystem and enjoy the new features of Android 13. In this guide, you will get to know how to download and install Android 13 Custom ROMs on Xiaomi Mi 9.
Table of Contents
Steps to download and install Android 13 custom ROMs on Xiaomi Mi 9
Step 1: Download the files needed for installing the custom ROM
First, you should grab hold of the Android 13 custom ROM file for your Xiaomi Mi 9. Once downloaded, you should rename the ROM file to “rom.zip” and recovery to “recovery.img” so that you can maintain uniformity in the commands while it’ll also become easier to type in the CMD window. Likewise, make sure that you transfer the files to the platform-tools folder on your PC.
Custom ROM files
Additional files
Step 2: Install Android SDK
To start off, install the Android SDK Platform Tools on your PC or computer. It’s the official ADB and Fastboot binary provided by Google. You should download it and extract it to a convenient location on your PC. Doing this will give you the necessary platform-tools folder.
Step 3: Enable USB Debugging and OEM Unlocking
Then, you will need to enable USB Debugging and OEM Unlocking on your smartphone. The former makes your smartphone recognizable by the PC in ADB mode. Meanwhile, it’ll allow you to easily boot your smartphone to Fastboot Mode.
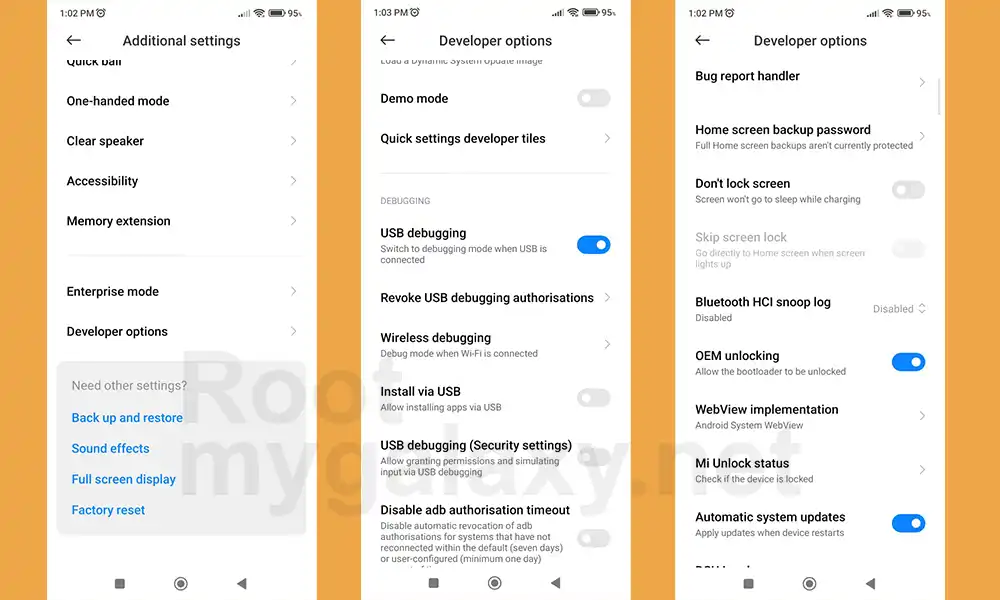
OEM Unlocking will be needed to carry out the bootloader unlocking process. You’ll need to go to Settings -> About Phone -> Tap on Build number 7 times -> Return to Settings -> System -> Developer Options -> Enable USB Debugging and OEM Unlocking.
Step 4: Unlock Bootloader on your Xiaomi Mi 9
You’ll also need to unlock the bootloader on your Xiaomi Mi 9 if you’re looking to install a custom ROM. Remember that doing this will wipe off the data and might even make your device’s warranty null and void.
Guide: How to Unlock bootloader on Xioami, Redmi and Poco Phones (MIUI Unlock Bootloader Guide)
Step 5: Boot your device to Fastboot mode
- Connect your smartphone to the PC using a USB cable
- Go to the platform-tools folder and type in CMD in the address bar before hitting enter to launch the Command Prompt
- Enter the following command in the CMD window for booting your device to the Fastboot Mode –
adb reboot bootloader
- Now, type the following command to verify the Fastboot Connection –
fastboot devices
- If you’re getting the Device ID followed by the Fastboot keyword, then your connection stands successful
Step 6: Install the Android 13 Custom ROM on your Xiaomi Mi 9

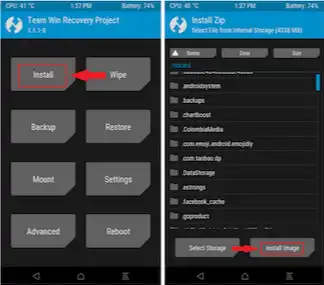
- Type the following command to flash the TWRP Recovery file (by downloading the selected link from the Downloads section above)
fastboot flash recovery recovery.img
- Now, use the below command for booting your device to TWRP Recovery
fastboot reboot recovery
- Once you’ve done that, go to Wipe -> Format Data -> type “Yes” before hitting Enter
- Now, go to Wipe -> Advanced Wipe -> check Cache, Dalvik, and Data
- Once you’ve done that, you need to go to Install, select the ROM.zip, and then perform a right swipe to flash it
- Lastly, you should head over to Reboot and select System
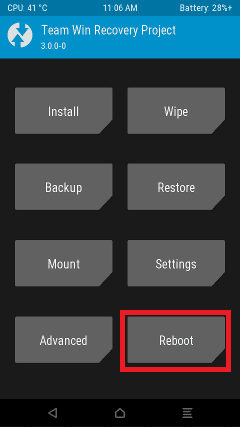
- Your Xiaomi Mi 9 will now be booted to the newly installed OS
The process of installing an Android 13 custom ROM on your Xiaomi Mi 9 is straightforward. Just follow the provided steps and if you need any assistance, leave a comment in the comment section down below and we’ll be happy to offer our support.
