Smartphones have become the most common way of sharing content between users in recent years. The ease of access, easy-to-use interface, and the ability to capture images and videos have made them an amazing option to make and share content. The new iOS 17 update is focused primarily on personalizing your iPhone’s experience, which includes new ways of sharing info with others through FaceTime, AirDrop, and other apps.
However, such tools can be misused by people with malicious intent. To prevent such incidents, a new feature dubbed “Sensitive Content Warning” has been added to the update.
If you are intrigued by this new feature, then this guide is ideal for you. In this guide, you will get to know what is Sensitive Content Warning and how to enable it on iOS 17.
What is the new Sensitive Content Warning feature on iOS 17?
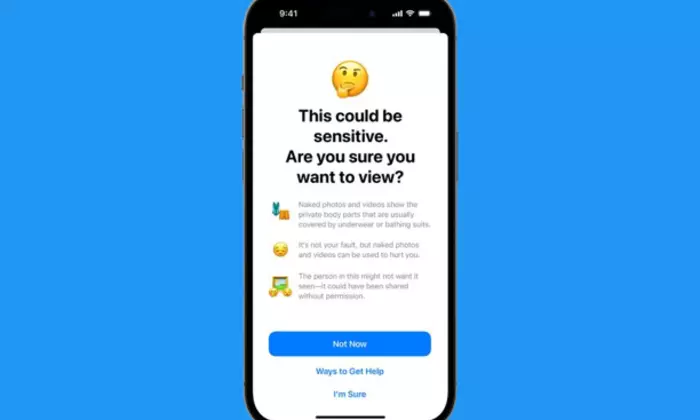
Sensitive Content Warning is a privacy and security feature that has been designed to help prevent you from viewing sensitive content in images and videos on your iPhone. If you receive any sensitive content through apps like FaceTime, AirDrop, etc., it’ll get processed and checked. Any sensitive content gets flagged if this feature has been enabled. If sensitive content is found, it will get blurred or hidden and the next time you try accessing it, you’ll get warned about the same.
How to enable this feature?
- Open the Settings app before tapping on Privacy and Security
- Scroll down before tapping on “Sensitive Content Warning”
- Then, you should tap and turn on the toggle for that at the top of the screen
- Once it is enabled, the supported apps and services that can use this feature show up under “App and Service Access”
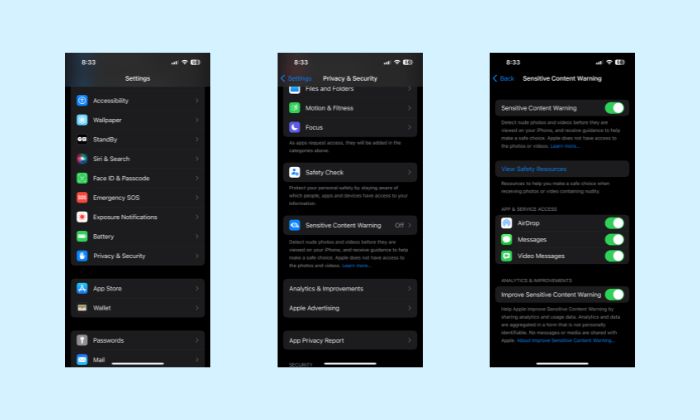
- Now, you’ll need to tap on the toggle for the apps where you’re looking to use this feature
- If you want to share the usage statistics, you can tap and turn on the toggle for improving Sensitive Content Warning
If you get a warning, you can tap on the “Show” option to view the content. Further, you can also tap the warning icon in the top right if you don’t want to view the content. You will get two options – Ways to get help and Block content
The “Ways to get help” option will take you to an Apple support page through the relevant support sources. Meanwhile, the “Block Content” option will allow you to block the contact such that they can no longer communicate with you. If you select Block Content, you need to tap on “Block” once more to confirm your choice.
Liked this post? Let us know on X (formerly Twitter) - we love your feedback! You can also follow us on Google News, and Telegram for more updates.
