In this step b step guide, you will learn How To Safely Flash /Install A Custom ROM Via TWRP Recovery Or CyanogenMod Recovery (CWM Recovery) On Any Android device. You can use this guide to install any other third party ROM (e.g: Carbon ROM, Chroma ROM and other AOSP ROM). So just follow the steps given below to Flash / Install A Custom ROM Via Recovery On Any Android devices
Note:- This guide is not for a single device. You can follow this guide to install / Flash any Custom AOSP ROMs On any android device having TWRP / CWM custom recovery on it. Make sure that you have the right ROM for your device. This is a very simple and easy process. Make sure your device’s bootloader is unlocked and your device has CWM / TWRP recovery. Then just flash the Custom ROM Zip file via TWRP / CWM recovery. Don’t worry we will be sharing all the steps so follow them carefully.
Custom ROMs are based on Official Android source codes which are customized or developed by developers or a community of developers. Custom ROMs come with loads of extra customizations which makes them unique and popular among the android lovers. Remember, Custom ROMs are not provided by Google or other mobile vendors but are developed and maintained by the community and its contributors.
If you want to Install / Flash CM13 ROM then follow this guide > How to Install LineageOS on any Android Via Custom recovery
If you don’t have TWRP On your android then install it Or Follow this guide–>>How to Install TWRP Recovery via Fastboot On Any Android Device
For Samsung devices–>>How to Install TWRP Recovery On Samsung Devices Using Odin
Important: Remember after installing the custom ROM you have to separately install the Gapps pack
Table of Contents
How To Install A Custom ROM Via Recovery On Any Android
Guide to Install A Custom ROM Using TWRP recovery:

Note: Make sure your device is rooted and you have a Custom Recovery Like TWRP Is Installed.For TWRP How To Download Latest TWRP Recovery On Any Android
→ Before Flashing any ROM, we highly recommend taking a nandroid backup via TWRP recovery.
How To Create & Restore Nandroid Backup On Android Devices- Download and transfer the ROM and Gapps file to your device’s internal storage / External storage (if expandable storgae option available)
- Boot your device into TWRP recovery.
- Select “Wipe” from TWRP main menu and do a “Swipe to Factory Reset” on the bottom of screen.

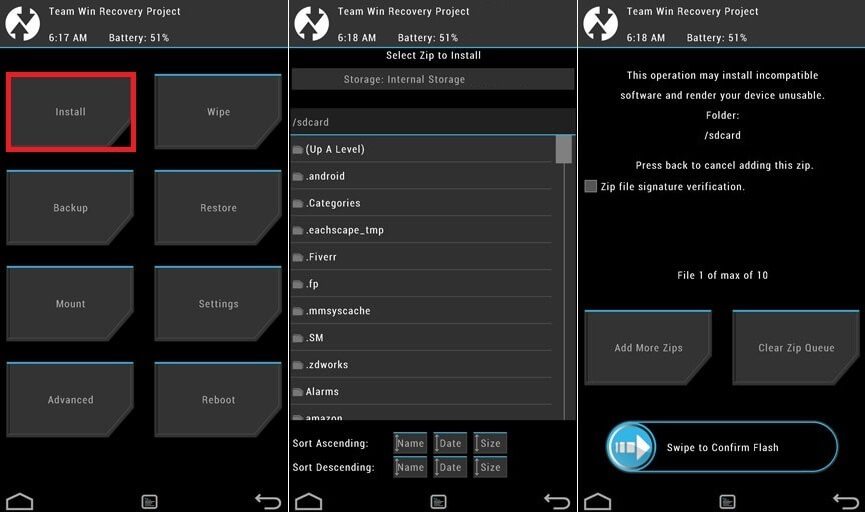
- Go back to TWRP main menu, tap on “Install” and select the ROM .zip file that you transferred to your device in Step 1.
- After selecting the .zip file, do “Swipe to Confirm Flash” on the bottom of screen to begin the custom ROM installation process. This may take some time.
- Once your ROM is successfully flashed, you’ll see “Wipe cache/dalvik” option, select it and then do “Swipe to wipe” on bottom of screen.
- Now flash the Gapps file similarly like you flashed the ROM file.
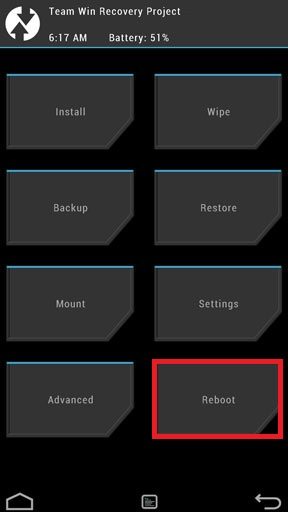
- After flashing both ROM and Gapps, Reboot your device.
Using Clock Work Mode Recovery (CWM):
- Download the custom ROM and put it in the Internal/external memory of your device (remember the path)
- Boot your device into CWM recovery.
- Take a NANDROID backup of your ROM (Important)
- From Recovery screen, select “Backup and Restore”
- Now select “Backup” to start the nandroid backup process.
After the backup is done, navigate back to main recovery screen.
- Now select “wipe data/factory reset” option. When it asks for confirmation, select “Yes” to confirm data wipe process.
- Then return back to main recovery menu. Now you will install the ROM zip file that you placed to SD card / Internal memory of your device in step 1.
- Select option “install zip from sdcard” then choose the ROM Zip file.When it asks for confirmation, select “Yes” to start installation
- Once the installation is completed, reboot your device.
- Done!!!
- Then Install the Gapps using the same steps.
Using Cyanogen recovery:(It is a stock recovery comes with CyanogenOS)
→ This is only for the devices which are running on Cyanogen OS (Like OnePlus One)
- Download and transfer the ROM and Marshmallow Gapps file to your device’s internal storage / External storage (if expandable storage option available)
- Boot your device into Cyanogen recovery.
- Now follow this guide to flash the ROM file via Cyanogen Stock recovery.
How to Install OTA Updates Zip File Via Stock Recovery If you have any question related to this post, feel free to leave that in the comment section.

Would I need to follow this process when a new version of the ROM is available? Also, after my phone boots and everything is done loading, if I reboot the phone (simple reboot, just a restart) it gets stuck in a bootloop, just showing the model number of the phone screen… I have to go through the whole wipe+install process again. what could be wrong?
You should always clean flash the new ROM.But the ROM is a update of older one.You can just flash it via the latest Recovery.
Do I download the RR file or the LineageOS file or both as well as the incr file? This $*%# is not very user friendly and I’m no noob… Thanks in advance chum.