Vivo Y70s (PD2002) is the first-ever Android smartphone from Vivo that comes with Samsung’s Exynos 880 processor out of the box. Cool, isn’t it? Well, that’s not the case for everyone because Exynos processors aren’t as fast or consistent performer as compared to Qualcomm Snapdragon or MediaTek chipsets. However, due to the optimized Funtouch OS 10 over Android 10, the Vivo Y70s device seems to be working quite well. Now, if you’re one of the Vivo Y70s device users and want to install the stock firmware flash file for some reason or want to go back to the Stock ROM then you can check this guide.
Whether you’ve flashed any other custom firmware on your Vivo Y70s device and now you want to go back to the stock firmware ecosystem again or the third-party firmware flashing process didn’t go well and you want to unbrick or restore your Vivo Y70s device, this guide is only for you. It’s worth mentioning that the stock firmware not only unbricks/restores your device but also offers all the official benefits like the optimized software, latest software updates, latest security patch updates, battery optimization, warranty support (if any), smoother & stable performance for daily/multitasking usage.
Talking about the Vivo Y70s device specifications, it has Samsung’s Exynos 880 SoC, Android 10 (Funtouch OS 10), a 6.53″ IPS LCD display, 6/8GB of RAM, 128GB onboard memory, 48-megapixels triple rear cameras, a 4500mAh battery (18W fast charging), a side-mounted fingerprint sensor, 5G connectivity, and more. Now, let’s check out all the useful features of having the stock firmware on your device.
Table of Contents
Stock Firmware Features
Stock ROM always comes preloaded with the device according to the model-specific for a specific brand. Each and every device model as well as each & every OEM does come with its own specific stock firmware. Stock ROM basically designed for the individual device model that runs smoothly and offers more stability, battery optimization, official software updates, fewer lags or stutters, etc.

While custom firmware (Custom ROM) is an aftermarket software that can be installed on your device (if compatible). But due to the unofficial firmware, it won’t get any brand-specific official software updates, may not get official support (under warranty), the stability & performance may get decreased, etc. Additionally, you’ll start noticing multiple bugs, errors, crashes, glitches, stutters, frame drops, unusual battery draining, device overheating, app crashes, app update failed, stock Google apps error, and lot more.
Whereas, sometimes users can’t properly flash the third-party firmware due to multiple processes, and more. In that case, it’s quite common to easily get bricked or stuck in the bootloop issue due to some flashing mistakes or file compatibility issues. So, it’s a good idea to either go back to the stock official firmware after checking out the third-party unofficial firmware or always stay on the stock ROM to get maximum performance, stability, and most importantly, official software updates.
Vivo Y70s PD2002 Stock Firmware Flash File (Back to Stock ROM)
Before heading over to the flashing guide, ensure to check out all the requirements and the download links below. Make sure to take a full data backup of the device’s internal storage like images, music, videos, documents, other files, etc.
Firmware Flash File Details:
- Download Format: Zip Verison
- Firmware Type: Official
- Tool Supported: QPST Tool/QFIL Tool/ADB & Fastboot Tool
- Gapps File: Included
- Device Supported: Vivo Y70s
Download (Fastboot Links)
Disclaimer:
RootMyGalaxy.net is not responsible for any damage happened to your device(s) while following this guide so please proceed at your own risk. However, we would be happy to help with any problems within our reach
Pre-Requirements:
- Make sure the battery percentage is more than 60%
- Install ADB & Fastboot drivers on your computer. Guide: For Windows or For Mac or Linux
- Now Enable Developer option.
- Create a full backup on your device How to Backup Important Data On Android (Non-rooted users)
- Install ADB & Fastboot drivers on your computer. Guide – Quickest Way To Install Android ADB and Fastboot (with drivers) on Windows or How to Install ADB and Fastboot on Mac or Linux
- Now, Enable the Developer option. Guide – How to Enable Developer Options & USB Debugging on Android
- You will also require a Windows PC/Laptop.
- Requires a USB cable for the device.
Method 1: Installation Stock ROM Using QPST Tool
- First of all, make sure you have followed each and every step mentioned in the pre-requisites section and download the QPST File.
- After downloading, you will find two files Qualcomm_USB_Drivers_For_Windows.rar and QPST.WIN.2.7 Installer-00429.zip.
- Open the QPST Win folder then Install the QPST.exe on your windows.
- Once it is installed, go to the Installed Location on Main Drive (C).
- Open the QPST Configuration, Click on Add new port -> Select the com port of your device -> and close it.
- After that Open the EMMC Software Downloader in the same folder located all the QPST Files.
- In EMMC Software Downloader, Check program bootloaders -> Browse for the device com port.
- Now, click on Load XML Def and browse for rawprogram0.xml in folder ROM in EMMC Software Downloader (make sure you have extracted the ROM Zip file).
- Click on Load Patch def and browse for patch0.xml in folder ROM.
- Check the search path 2 and browse for the folder ROM.
- After all this click download, wait for the download to finish (it will find a new driver, install that)
- Now, wait for the process to finish. Once it is done, remove your device from PC and you have installed Stock ROM on Vivo Y70s.
Method 2: Using QFIL Tool
Step 1: Make sure that your PC has Qualcomm USB drivers installed on it. (If not download and install them, check pre-requirement section)
Step 2: Download the Qualcomm Flash Image Loader (QFIL) on your computer and Extract that using any unzipper app like WinRAR.
Step 3: Now go to the extracted folder and Open QFIL.exe.

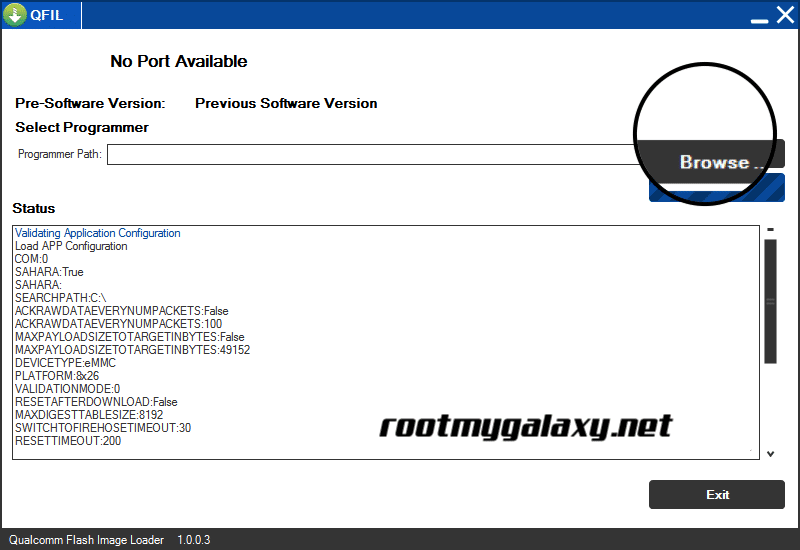
Step 4: Once you enter the QFIL tool, you will see the basic user interface of the tool.

Step 5: Now, Switch Off your Smartphone or Tablet.

Step 6: After your Device is powered Off, Press and Hold the Volume UP Key and Connect the Device to the Computer using USB Cable.

Step 7: Now, In QFIL, Click on Browse Button
Step 8: Now locate the Firmware File (.mbn).

Step 8: Once, you have added the firmware file, the QFIL tool will automatically load the rest of the firmware data.
Step 9: Now, Click on the Download button to begin the Flashing Process.

Step 10: Like all other devices and tools, this flashing Process will take up to 10-15 minutes to complete. Once the Flashing process is completed your device will be reboot automatically.
Keep visiting the blog for more info.
