The newest addition to the OnePlus lineup is under a lot of pressure as it needs to deliver after the recent busts with the releases. OnePlus 11 needs to stand out from the crowds and try to reclaim the brand’s lost glory.
While only time will tell if the device will be successful or not, one thing is for sure – the device is active in custom development. OnePlus 11 can be improved by installing custom/GSI ROMs and a plethora of tweaks and mods. You can do so by rooting your OnePlus via Magisk. In this guide, you will get to know how to root OnePlus 11 using Magisk Patched Boot.
Table of Contents
How to root OnePlus 11 [Step by step]
Step 1: Install Android SDK
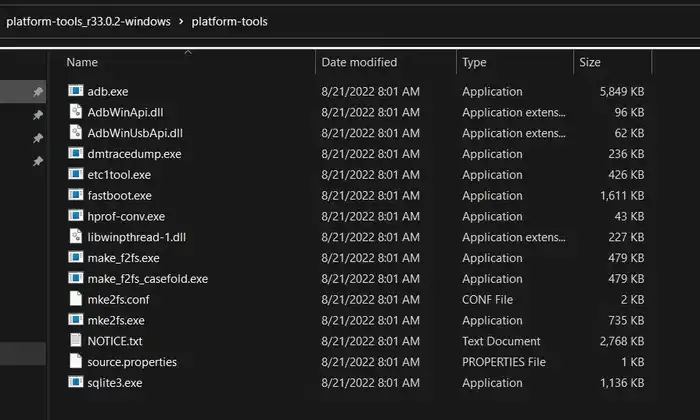
Firstly, you’ll need to install the Android SDK Platform Tools on your PC. It’s the official ADB and Fastboot binary offered by Google. You’ll need to download it and extract it to a convenient location on your PC.
Step 2: Enable USB Debugging and OEM Unlocking
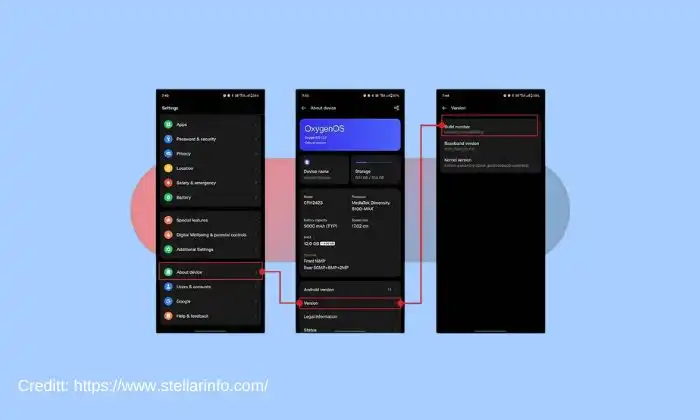
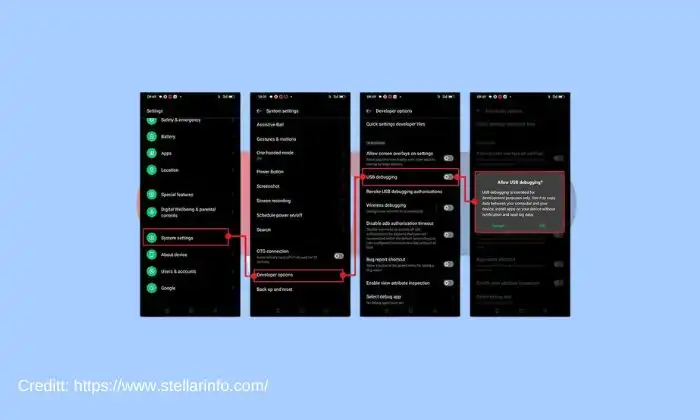
To start off, you’ll need to enable Developer Options on your smartphone. Go to settings -> About Phone -> tap on build number 7 times -> return to Settings -> system -> advanced -> developer options -> finally enable USB debugging and OEM Unlocking.
Step 3: Unlock the bootloader
There is often an element of confusion regarding this step but to put it into perspective, you’ll need to unlock the bootloader on your device. Remember, unlocking the bootloader on your OnePlus 11 will mean wiping off all the data on your phone and nullifying the device’s warranty.
Guide: How to unlock bootloader on OnePlus 11 handsets
Step 4: Download OnePlus 11 Firmware
Then, download the stock firmware for your OnePlus 11 from the official website of OnePlus. You can even download the Fastboot ROM and extract the boot.img, vendor_boot.img, and vbmeta.img files.
Download OnePlus 11 Fastboot ROM
Download OnePlus 11 Boot.img
Download OnePlus 11 Vendor_boot.img
Download OnePlus 11 Vbmeta.img
Step 5: Extract OnePlus 11 Payload.bin
Once you’ve downloaded the firmware, you should extract it to a convenient location on your PC. Doing this will give you a couple of files, including the payload.bin. If you didn’t know this already, OnePlus packs all its partition IMG files inside the payload.bin files, so you’ll need to extract it first.
Once the extraction is complete, you should transfer the boot.img and vendor_boot.img files to your device. On the other hand, you should transfer the vbmeta.img to the platform-tools on your PC.
Step 6: Patch OnePlus 11 Boot and Vendor_Boot through Magisk

- Download and install the newest Magisk APK onto your device
- Launch it and then tap on the Install button near Magisk
- After that, you should choose “Select and Patch a File”, and navigate to the stock boot.img file before selecting it
- After that, tap on the “Let’s Go” button located at the top right
- The boot.img file will get patched and placed under the Downloads folder on your device
- Once it is done, tap on Install next to Magisk before choosing Select and Patch a File
- Next, select vendor_boot.img file and tap on the Let’s Go button located at the top right
- It’ll patch this file too
- Once it is done, the patched file will be present in the Downloads folder
- Transfer both the files (Patched Vendor_Boot.img and Patched Boot.img) to the platform-tools folder on your device. You’ll be using both files to root your OnePlus 11 through Magisk
Step 7: Boot your device to Fastboot Mode
- Connect your phone to the PC via a USB cable
- Ensure that USB debugging is enabled
- After that, head over to the platform-tools folder, and type in CMD in the address bar, before hitting Enter
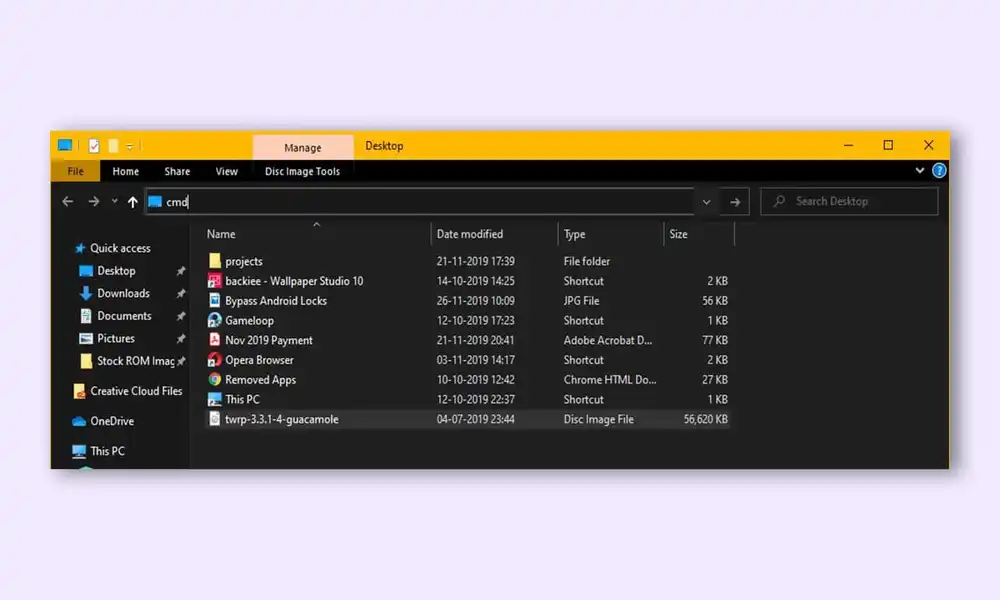
- It’ll launch the Command Prompt
- Type in the following command in the CMD window for booting your device to Fastboot Mode
adb reboot bootloader
- Then, type in the below command to verify the Fastboot Connection
fastboot devices
- If you’ve got a device ID followed by the fastboot keyword, the connection will be successful
- You can proceed to the next step for rooting your OnePlus 11 via Magisk Patched Boot
Step 8: Flash Patched Boot, Stock VBmeta, and Vendor_Boot
- To start off, ensure that the patched boot, patched vendor_boot, and stock vbmeta.img files are present in the platform-tools folder
- After that, rename the patched boot file to magisk_patched.img and patched vendor_boot file to magisk_patched-vb.img
- Open the CM window inside the platform-tools folder and then type in the following command to disable verity by flashing vbmeta
fastboot --disable-verity --disable-verification flash vbmeta vbmeta.mg
- After that, execute the below command for flashing the patched vendor_boot
fastboot flash vendor_boot magisk_patched-vb_img
- Then, boot your smartphone using the patched boot.img file
fastboot boot magisk_patched.img
- Launch the Magisk app and then tap on the install button next to Magisk
- Select Automatic Installation and wait for the entire process to complete
- Once it is done, tap on the Reboot button present at the bottom right and your device will boot to the rooted OS
How to Fix OnePlus 11 Stuck in Bootloop after Root
Are you experiencing a bootloop on your OnePlus 11 after rooting it? If so, don’t be alarmed. This is a common issue that can usually be fixed easily. In this blog post, we will explain how to fix the OnePlus 11 stuck in bootloop after root by flashing the stock boot, vbmeta and vendor_boot files across both slots using Fastboot commands.
First of all, make sure you have installed ADB & Fastboot tools on your computer and connected your device with USB debugging enabled before proceeding further. Once done with that part then follow these steps:
fastboot flash boot_a boot.img
fastboot flash boot_b boot.img
fastboot flash vbmeta_a vbmeta.img
fastboot flash vbmeta_b vbmeta.img
fastboot flash vendor_boot_a vendor_boot.img
fastboot flash vendor_boot_b vendor_boot.img
fastboot reboot
Your device should now successfully restart without any issues but do keep patience while first time startup process completes since its normal behavior for all phones even when upgraded/downgraded OS version or flashed custom ROM etc..
