Windows 11 offers a robust solution for website blocking, accessible directly within your operating system: the Hosts file. This unassuming text file wields considerable power, enabling you to map hostnames to IP addresses and effectively control website access.
By strategically editing its contents, you can redirect specific website requests to a non-functional IP address, rendering them inaccessible on your Windows 11 PC.
So, if you want to easily block time-wasting or inappropriate websites on your Windows 11 computer, the Hosts file is your ticket. Just follow this guide to harness this built-in Windows tool for gaining more control over your web browsing experience.
Steps to Block Websites on Windows 11
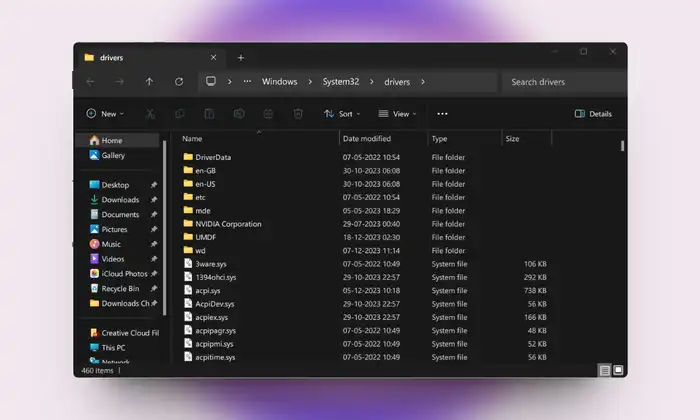
- Open File Explorer on Windows 11 PC.
- Go to C:Windowssystem32driversetc.
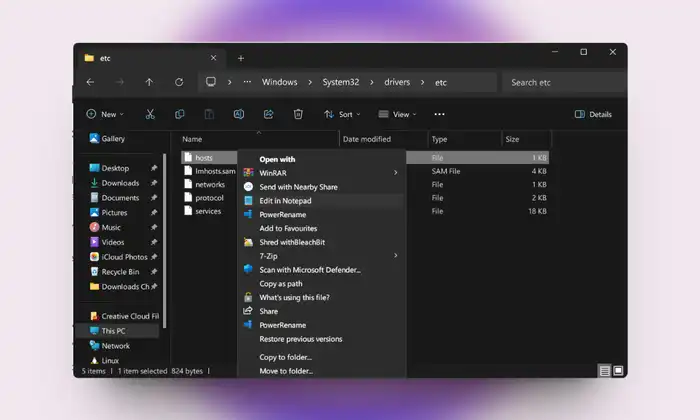
- Right click on the Hosts file then select Open With and choose Notepad.
Identify Localhost IP Address:
Within the Hosts file, note down the localhost IP address (commonly 127.0.0.1).
Block a Single Website:
- Scroll to the end of the file create a new line by pressing Enter.
- Type your localhost IP address, press Tab for space and enter the desired website URL.
For Example:
127.0.0.1 www.facebook.com
Block Multiple Websites
- Follow the same syntax for each additional website.
- Separate each entry with a new line.
For Example:
127.0.0.1 www.facebook.com
127.0.0.1 www.google.com
127.0.0.1 www.twitter.com
Save Changes
Press Ctrl+S to save the modifications to the Hosts file.
Empower yourself with the ability to control website access on Windows 11 PC using the Hosts file. By following these user friendly steps you have successfully Block Websites on Windows 11 specific websites enhancing privacy and control.
Customize blocked list as needed and feel confident in newfound control. Should encounter any challenges or have questions, drop a comment below for personalized assistance. Your Windows experience just became more tailored to user preferences!
