How to Root Samsung Galaxy devices using CF Auto Root and Odin Tool: The rooting process of Samsung devices is different from other OEMs.There are two ways to root Samsung devices 1) With TWRP 2) With CF Auto Root.First, users have to unlock the bootloader of the device, then TWRP installation should be done using Odin flash tool.Once Odin Flash Tool is installed, users can flash supersu or magisk to get root access on their devices.Don’t worry here we will be covering everything which will help you to Root Galaxy C7 SM-C7000 On Android 7.0 Nougat.But there is another way which is using CF-auto root.Here we will be sharing a guide to root the device by CF-auto-root.
Even though the simplest way of rooting Android devices is by flashing via TWRP recovery, for Samsung Galaxy devices, rooting is simple when done with Odin tool to flash CF Auto Root file. CF Auto Root file is available for all Samsung Galaxy devices except the ones from AT&T and Verizon where the bootloader is locked.
ChainFire(CF) is the same company that has developed SuperSU which is one of the best root managers of Android. Head over to CF Auto Root to download flash file according to your device model and firmware build.
What is Rooting An Android Device Mean?
Rooting is the process of gaining full admin control of the Android device.You can use the device to its full potential,‘Rooting’ means giving yourself special privilege or “root permissions” on your phone. It’s similar to running programs as administrators in Windows.
After rooting your device you can install different MODs, kernel, ROMs on your device.You can install latest Android updates (like the Android 7.0 Nougat) On old device by installing third party ROMs like CyanogenMod 13.You can overclock the CPU and GPU of your device to get the best performance.You can hibernate any app you want.You can underclock the CPU to get better battery life.
For more information about Android rooting, check out our detailed post here > What Is Rooting Android Phone? Advantages And Disadvantages
Disclaimer
RootMyGalaxy will not be responsible for any damage that might occur to your devices while executing the following steps and hence, you should proceed at your own risk.
Pre-requirements
- Make sure that the USB drivers for your Android device are installed on the PC. (check download section below)
- Follow the below Guide Exactly or else it may lead to brick your device. RootMySamsung Galaxy.net is not responsible for any damage.
- Enable USB Debugging.Guide > How to Enable Developer Options, USB Debugging and OEM Unlock on Android
- We recommend to take complete backup and proceed.
- Download the right CF Auto Root file as per your device model and current firmware.
Steps To Root Samsung Galaxy Devices using CF Auto Root and Odin Tool
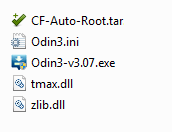
Step 1. Download the appropriate CF Auto Root zip file on your computer and unzip it. You will find both CF Auto Root tar file and Odin tool in it.
Step 2. You need to boot your Galaxy device in the Download mode by pressing the Volume Down button, Home, and Power buttons together for a few seconds until you see Download mode is active.
Step 3. When you enter the Download mode, you will see a yellow triangle giving you a warning. You need to press Volume Up key to continue.
Step 4. Open Odin tool from the unzipped folder in Step 1. Connect your Samsung Galaxy device to your computer via USB cable.
Step 5. When the device is connected, you will get the message “Added!” on Odin.
Step 6. Click on AP option and select the CF Auto Root tar file from step 1.
Step 7. Click on the button Start to start the flashing process. This is going to take some time and hence, you have to wait patiently.
Once the process is done successfully, you will get the message “Pass” on Odin. Then your device will reboot automatically and you can disconnect your device safely. You can even verify whether your device is rooted correctly or not by installing the app Root Checker.

i have a samsung galaxy s7 edge SM-G935PVPU4APL6 Sprint. Android version 6.0.1
i’ve been having lots of trouble trying to root this phone i have rooted other phones before and no trouble.
am using windows 10.
i tried this method and used the firmware downloaded and the latest version of Odin. i downloaded the drivers and updated to the latest/
other firmware would pass without any problems in odin but it stays bootloop and i have to restore to stock.
i also used package disabler pro and disabled samsung dm phone interface, samsung dm services, securitylogagent. i found that in another forum supposedly helped but nothing.
this method keep failing so does others.
I am having trouble getting Odin to see my Samsung Galaxy S6. I have the ADB tool from another task I have successfully completed thanks to instructions here on RootMyGalaxy. As part of that other task, I got Koush’s USB drivers. I know they’re installed on both USB ports that I use for my phones. The driver information from the Windows 7 Device Manager says ClockworkMod. That’s Koush’s driver, right? In addition, when I execute ADB DEVICES, it shows my 2 phones. Both in a single response. Yes, I know the ADB SHELL doesn’t work when 2 phones are attached. But I was not going to get into the ADB SHELL. I was just proving that I have the improved USB drivers. I was among those who couldn’t get ADB to see my phones at all. I got the Koush USB drivers. Now ADB sees the phones. Point proven. In addition, Windows Explorer (the file manager, not the web browser) is able to get into the data on both phones. That doesn’t particularly prove anything because that was working before I installed the Koush USB drivers. But it’s still working after installing the Koush USB drivers.
Now I’m trying a new task. I want to root my S6. I downloaded a CFAR file from a link you supply on this site for the SM-G920V, my phone. But the Odin inside that CFAR file is an out of date version, 3.10.6. So I downloaded a newer Odin into a separate directory. version 3.14.4. My plan was to execute that Odin & when I got to the point of clicking the AP button inside the newer Odin, I would tell it about the CFAR file inside the other directory where the older version of Odin resides.
Let me make that clearer. I have one directory with the CFAR file & an old Odin that I will ignore. I have another directory with a new Odin that I will execute.
I follow your instructions above & Odin does not see the S6. I have no intention of using Odin against the other phone. I’m interested in just the S6. Everything I’ve described here eliminates the possibilities (listed in another article here on RootMyGalaxy) that could cause the failure:
– I have the Koush drivers.
– The USB cables are both brand new, bought within the past month.
– My Windows desktop system is able to navigate the files on both phones.
– ADB lists the phones, which proves I’ve turned on USB Debugging on both phones.
Despite this, Odin does not recognize the S6. When I plug the USB charging cable into the PC & the S6, the Windows Device Manager almost immediately updates, reflecting the fact that the phone is connected. Odin doesn’t see it. I have left it sitting for as long as 5 minutes. It still doesn’t see it. Shouldn’t it see it almost instantaneously?
Please offer some insights, maybe even something else I can try.