Unlock Bootloader and Root Google Pixel 6A: When it comes to the Android OS, unlocking the bootloader and getting root access is the most common way of customizing the handset. Gaining full superuser access on your Android device is needed to install advanced or powerful apps that need root. Getting root access on your Android smartphone always needs an unlocked bootloader.
Due to the open-source nature of Android OS, many users opt-in for the system-level customizations to get added functions apart from custom look and feel. In that scenario, both the bootloader and rooting will be necessary enough. It’s worth mentioning that after unlocking the bootloader, you’ll be able to flash custom ROMs.
Stock ROMs do offer better stability and quicker software updates, many users might not be interested in a simple-looking stock firmware for years. Moreover, aside from software support, users also want to install custom firmware and get a taste of the latest Android OS. The Google Pixel 6a is a new smartphone, which leads the developers to build custom firmware, which requires you to unlock the bootloader and root.
You May Like: [Reason] Pixel 6 phones on Android 13 can’t roll back to Android 12
![]()
Prerequisites to keep in mind
- Install Magisk on your smartphone
- Take a backup of your device’s data
- Install ADB and Fastboot drivers on the PC
- Download the latest Android SDK Platform-Tools
- Download Factory Image for Google Pixel 6a
Unlock the bootloader of your Google Pixel 6a
- Take a backup of your smartphone as unlocking the bootloader removes all the data from your phone. Moreover, ensure that you’re installing ADB and Fastboot drivers on your PC.
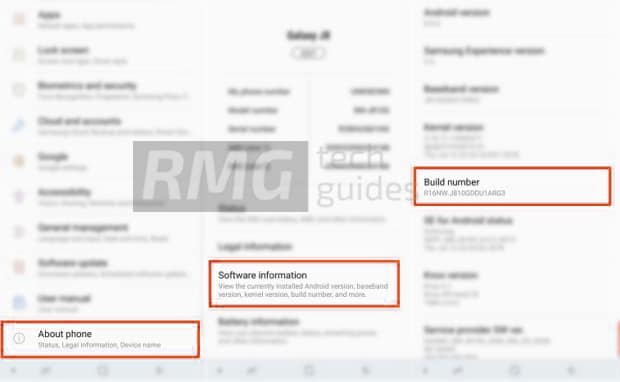
- Open Settings on your Google Pixel 6a and head over to System -> About Phone and then tap Build Number 7 times to enable the developer options.
- Head over to the System and go to Advanced -> Developer options.
- In developer options, you should enable OEM Unlocking and USB Debugging.
- Boot your Google Pixel 6a into Fastboot Mode. Then, connect your smartphone to your PC using a USB cable. You can even use the ADB reboot downloader command.
- Open Command Window/CMD on your PC.
- Enter the below command for initiating unlock bootloader on Google Pixel 6a

fastboot flashing unlock
- It’ll display different options on your smartphone. Use the volume buttons and navigate to “Unlock bootloader” and then use the Power button for selecting it.
- It unlocks the bootloader of your device while deleting all the data.
- After unlocking the bootloader, you should enter the following command to reboot to the system –
fastboot reboot
- You’ve successfully unlocked the bootloader on your Google Pixel 6a.
Once you’ve unlocked the bootloader, you’ll see it in the fastboot or bootloader mode under status. The unlocked word is going to be marked red. It essentially means that the bootloader is locked and you’ll be able to root your device or install custom ROMs and custom Recoveries.
Steps to root Google Pixel 6a using Magisk
- Extract the boot image from the downloaded Factory image. Then, copy the boot.img to the device’s storage. Moreover, extract the platform tools zip file on your PC.
- Open the Magisk app and then click on Install.
- Choose the option “Select and Patch a File” and then select the boot.img.
- It’ll patch the boot file and the output will get saved in the download folder.
- Copy the patched boot image to the extracted platform-tools folder before renaming the patched boot image to boot.img. Moreover, copy the vbmeta.img from the extracted firmware to the platform-tools folder.
- Open CMD in the platform-tools folder.
- Turn off your device and boot it into fastboot mode. Press and hold Volume Down and Power button simultaneously for booting into the Fastboot Mode.
- One your phone is in fastboot mode, enter the below command for flashing vbmeta –
fastboot flash --disable-verity --disable-verification vbmeta vbmeta.img
- It you have to do a data wipe, you should do it. Now, boot your device into the patched boot image with the given commands –
fastboot boot boot.img
- Your device will boot into the system. Then, open Magisk app and then click on Install -> Direct Install.
- Once the installation is complete, click on Reboot.
- Your Google Pixel 6a device will boot with permanent root access.
You’ll be able to confirm the root access in Magisk or another third-party root checker app. Once you’ve gained root access, you’ll be able to enjoy all of the features. It’ll allow you to use different Xposed Modules after you’ve installed the Xposed framework.
