Unlock Bootloader and Root Asus Zenfone 9 (No TWRP): This article will show you how to use Magisk to root your Asus Zenfone 9. (No TWRP Required). Magisk now supports rooting the Asus Zenfone 9, and TWRP recovery isn’t even required. To Root Asus Zenfone 9, this is now the only option given that there is no TWRP recovery available for the devices.
Once you have rooted your Asus Zenfone 9, you’ll have access to a plethora of previously unavailable functions, including the ability to install third-party apps, flash custom ROMs, optimise your phone’s speed, and more. In order to access the full potential of an Android smartphone, rooting is required. Having your Asus Zenfone 9 rooted enables the installation of a wide variety of user-created software, such as Custom MODs and ROMs.
About Asus Zenfone 9
The Asus Zenfone 9 is an extremely powerful premium phone aimed for a certain demographic. The 5.9-inch FHD+ screen can refresh at up to 120 frames per second. The phone has the cutting-edge Snapdragon 8+ Gen 1 processor and the Adreno 730 graphics processing unit. The Zenfone 9 has 128GB and 256GB of UFS 3.1 storage space, along with 8GB or 16GB of LPDDR5 RAM.
Dual back cameras are a standout feature of this phone. It has a 50MP main sensor and a 12MP ultrawide camera. Just one 12-megapixel selfie camera sits up front. It houses a 4300mAh battery
What is Rooting An Android Device Mean?
The process of obtaining complete administrative control of an Android device is referred to as rooting. When you “root” your device, you give yourself special privileges or “root permissions” on your phone, which enables you to use the device to its fullest extent. It is comparable to running programmes in Windows with administrative privileges.

For more information about Android rooting, check out our detailed post here > What Is Rooting Android Phone? Advantages And Disadvantages
Important Note: Without TWRP, you can’t flash the root files like Magisk. Now we have to manually modify the stock boot image by patch to get root access on the device
How To Root Asus Zenfone 9 With Magisk Manager
#1 Unlock the bootloader
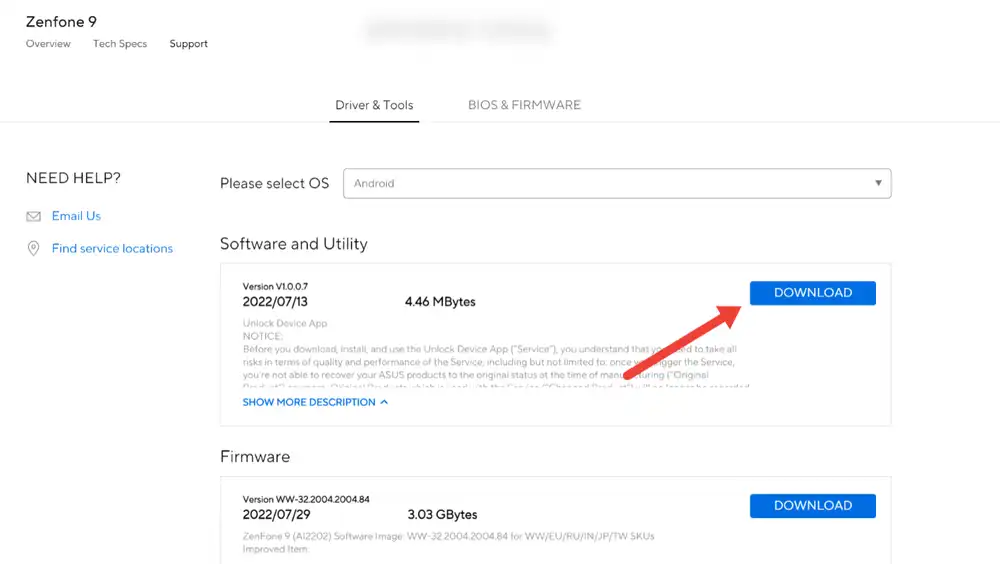
- Open Zenfone 9 official support page on your browser.
- Now on the webpage switch to the Drivers and Tools section. And in the drop-down option, select Android.
- Download and Install the ‘Unlock Device App’ for Zenfone 9.
- Now go to Settings > About Phone and tap Build Number 7 times to Enable developer options.
- Go back to Settings then open Developer Options. Enable OEM unlocking and USB Debugging.
- Now Open the Unlock app which you download earlier and accept all the terms and conditions
- Tap on Unlock bootloader button in the App. This will erase data and unlock the bootloader.
- Done!! Your device’s bootloader should have unlocked.
#2 Download stock boot image
- Download the latest firmware of your device (Stock ROM)
- Extract the boot image file (boot.img) from the Asus Zenfone 9 firmware using payload dumper.
#3 Patch boot image
- Move the boot.img to your device’s internal storage.
- Download & install the latest Magisk Manager on your device
- Open magisk manager, On the main screen, select Install > Install > Patch Boot Image File
- Now select the boot image (boot.img). Magisk will start to patch the boot image.
- After completion, the file will be saved as “magisk_patched.img” in your Downloads folder
#4 Finally, Root Asus Zenfone 9
- Connect your device to PC and transfer the “magisk_patched.img” file from your phone’s download section to the platform-tools folder on your PC
Download and Install Latest ADB and Fastboot SDK Platform-Tools (2019)
- Now issue the following command to boot your device to bootloader mode (Make sure your device is connected to the PC)
adb reboot bootoader
- Now issue the command given below to Flash the patched boot image
fastboot flash boot magisk_patched.img
- For devices with A/B partition system, use the below commands:
fastboot flash boot_a patched_boot.img

fastboot flash boot_b patched_boot.img
Note: If you have MediaTek powered device you can follow this guide to flash the patched boot.img > How to Install MediaTek Stock ROMs With SP Flash Tool (MTK Android Smartphones)
Done !!! Just reboot your device. Your device should be rooted now.
